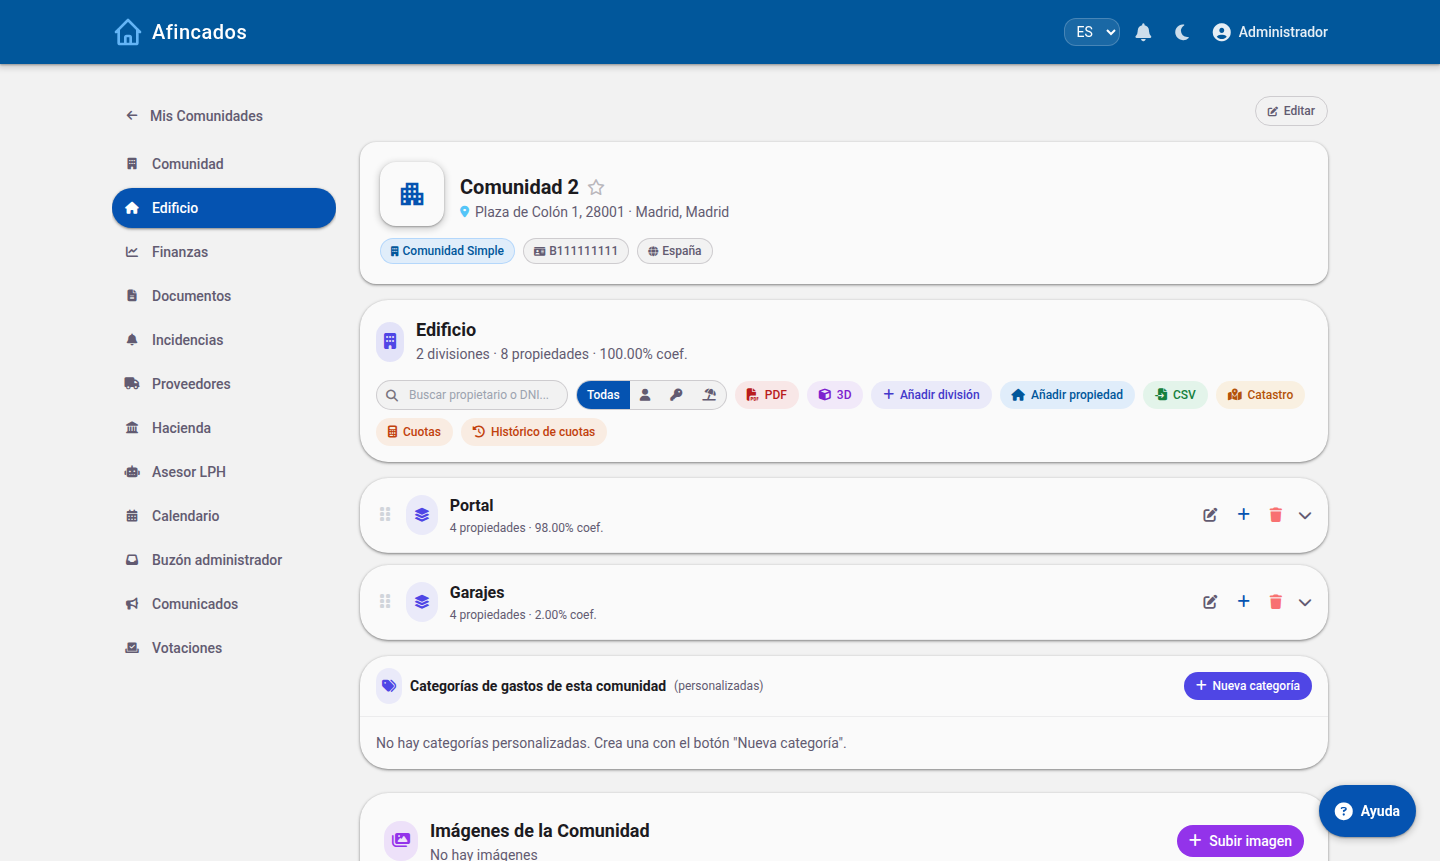
Units, ownership shares, blocks, floors, Land Registry data and the 3D building view.
1.1 Adding properties and importing from the Land Registry
Updated on
15/09/2026
Create the units with their ownership shares or pull them straight from the Land Registry.
Properties are the foundation of the whole financial side: expenses are split across them according to their ownership share, and that is where each resident fee comes from. It is worth taking your time here so you do not have to correct fees later.
From the Building header you add properties, import from the Cadastre or upload a CSV.
Creating a property
Open the community and go to the Properties tab.
Click Create property.
Enter its identifier (for example, "3rd floor B" or "Unit 2") and the block or division it belongs to.
Select the type: flat, commercial premises, garage or storage room.
Enter the ownership share, which determines what portion of each expense it carries.
Assign the owner, if they are already registered as a user.
Save.
The ownership shares of all properties must add up to 100. The application warns you if they do not.
Importing from the Land Registry
If you know the Land Registry reference of the building, you can skip creating units by hand:
On the Properties tab, click Query Land Registry.
Enter the Land Registry reference of the building.
The application queries the Land Registry and lists every unit found, with its floor area and its use.
Review the list, tick the ones you want to bring in and click Import.
The properties are created with the registry data already filled in. All that is left is to adjust the ownership shares and assign owners.
Importing from CSV
You can also upload a file with the full list of units. Download the template from Import properties, fill it in and upload it; you will see a preview before confirming.
Bulk operations
Once you have a lot of properties, select them with the checkboxes on the left and apply changes to all of them at once:
Assign division: move several units to the same block.
Change type: for example, mark every garage on a floor.
Assign expense categories: define which costs affect that group of properties.
Delete: remove several units in one go.
Before you calculate fees
Check that every property has an ownership share, an owner and the right expense categories. If a garage should not pay for the lift, remove that category from it: this is how you make the split of costs match what the community agreed.
1.2 Buildings, floors and the 3D view
Updated on
15/09/2026
Define blocks and floors, and view the community in 3D to pinpoint incidents.
The buildings and floors structure is the community floor plan inside the application. It is used to group properties, split costs by division and, above all, to pinpoint incidents visually on a 3D model.
Each division (entrance, car park…) groups properties and adds up its share.
Creating a building or division
Open the community and go to the Buildings tab.
Click Create building.
Give it a name (for example, "Block A" or "Building 1").
Enter the number of floors, including basements and the ground floor where applicable.
Save.
You can reorder buildings by dragging them, so they appear in the same order as in real life.
Floors
Within each building you define its floors and the properties on each one. If every floor is identical, create the first one and use Duplicate floor: its layout is copied and all you have to do is rename the units.
The 3D view
The View in 3D button opens an interactive model of the building. You can rotate it, zoom in and click on any unit or common area.
Its main use is working with incidents: when reporting a fault you can mark it directly on the 3D model, so the supplier knows exactly where the problem is with no need for explanations. Open incidents appear flagged on the model.
Adjusting the appearance
Labels: show the identifier of each unit on the model.
Settings: let you adjust floor height, colours and orientation so the model resembles the real building.
KML: if you have a KML file with the geometry of the building or the plot, you can upload it so the representation matches the plan.
Inventory
Each division can have its own inventory of common items: boilers, lifts, fire extinguishers, irrigation pumps and so on. Recording them lets you generate QR labels to stick on the equipment. Scanning the QR code opens the public record of that item, with its history of inspections and incidents.
Exporting
The Export to PDF button produces a document with the full structure of the building and its properties, handy to attach to a meeting notice or hand to a supplier.