What each role can do in the app: property manager, president, resident and worker.
1.1 President and board guide
Updated on
13/09/2026
What the president, vice-president or board member can manage, and how it differs from the property manager.
The president — along with the vice-president and board members — can manage almost the whole community, but has no access to the tax area or the manager's internal tools.
What you see
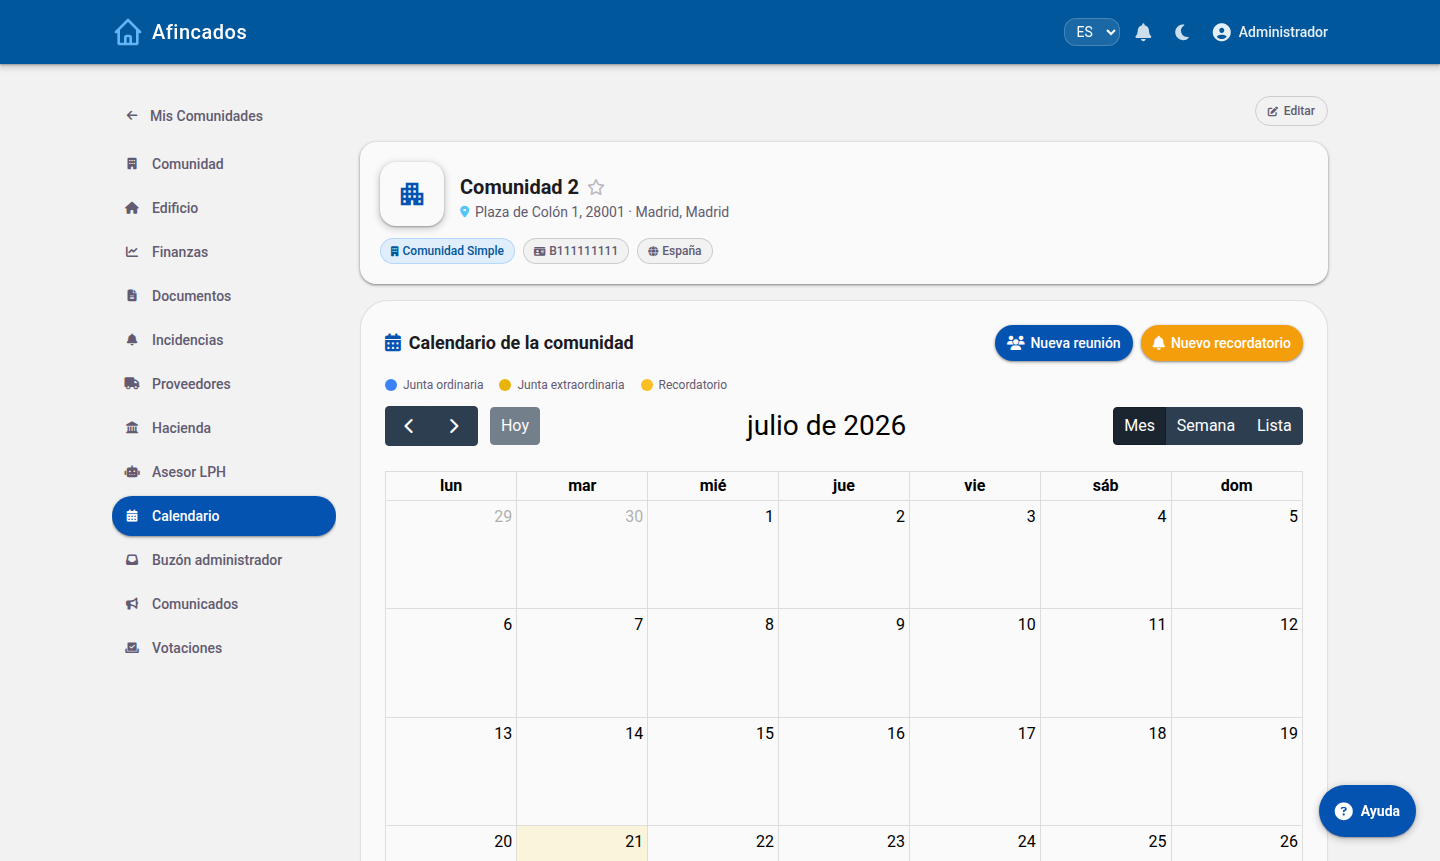
The sidebar shows Community, Building, Finances, Documents, Incidents, Suppliers, Passes, Announcements and Votes.
President view. Tax, LPH Advisor, Calendar and Manager inbox are not shown: they belong to the property manager.
What you can manage
Residents and properties: add users, edit properties and ownership shares.
Fees: calculate ordinary fees, create special levies and track payments.
Incidents: create, assign to a supplier or worker, and close them.
Meetings: call meetings, record attendance and publish the minutes.
Announcements and votes.
Documents: upload minutes, contracts, budgets and invoices.
Finances
Accounts and transactions: full visibility to oversee the accounts.
Incidents, announcements and votes
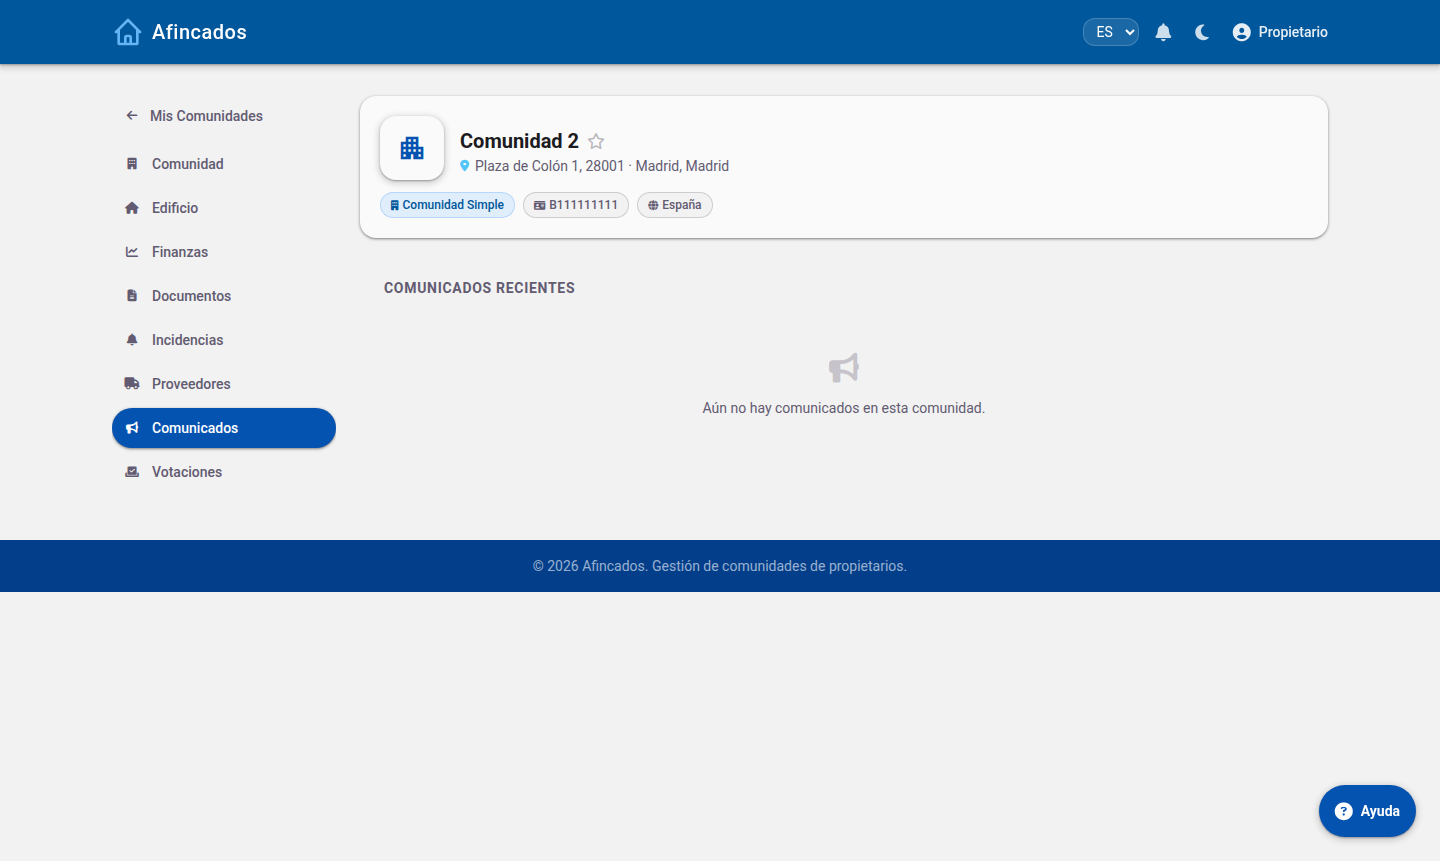
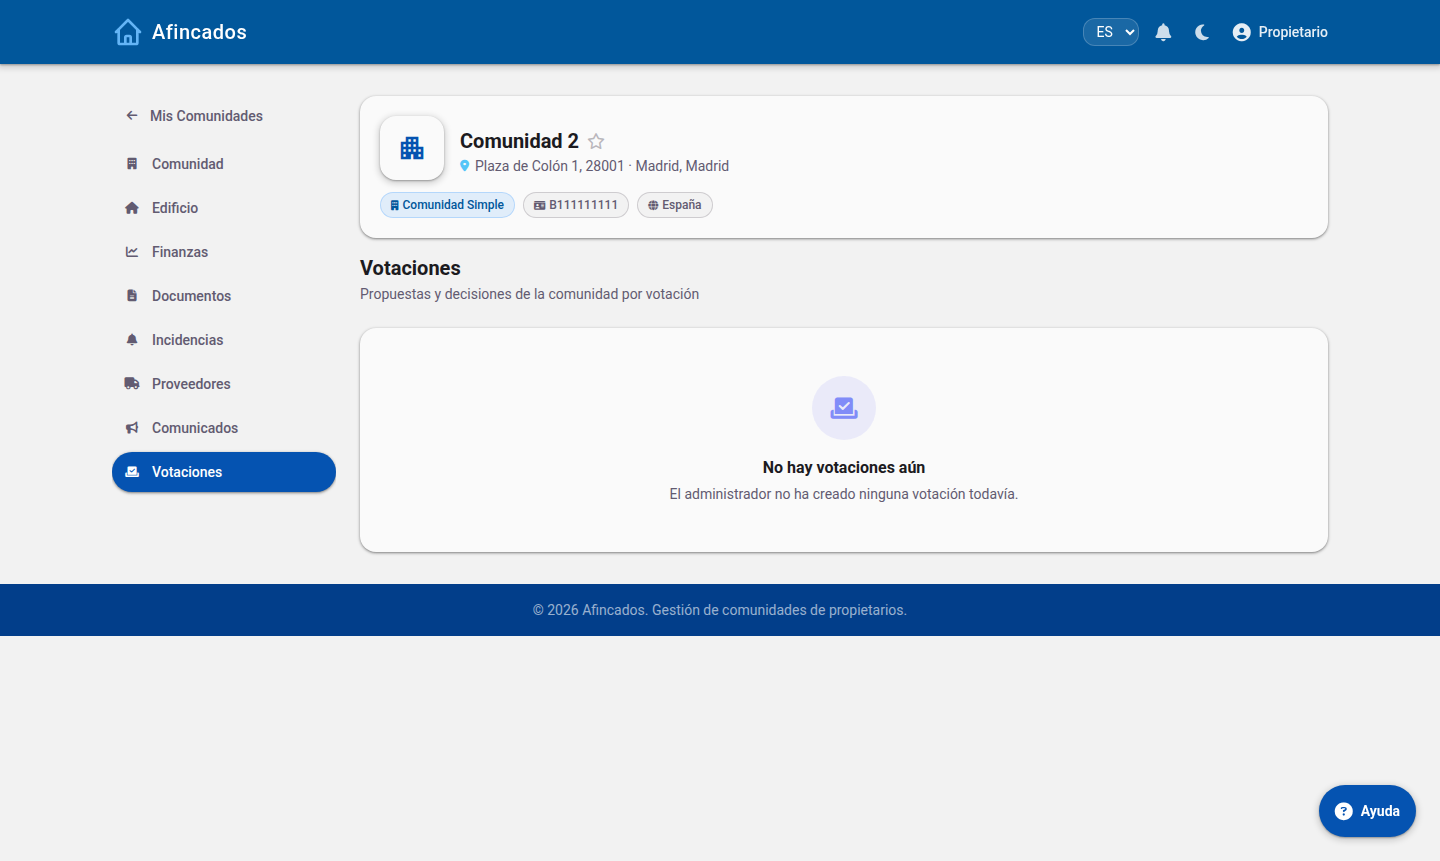
Filter by status and see who each incident is assigned to.Live results and turnout.
Differences from the property manager
Feature
President / Board
Property manager
Residents, properties and shares
Yes
Yes
Fees, levies and arrears
Yes
Yes
Incidents, meetings and minutes
Yes
Yes
Tax: staff, payslips and forms
No
Yes
LPH Advisor and Calendar
No
Yes
Create new communities
No
Yes
1.2 Property manager guide
Updated on
15/09/2026
Everything you can do as a property manager: communities, building, finances, tax, incidents, suppliers and communication.
The property manager is the role with the most permissions in the application. It is the only one that sees the Tax, LPH Advisor, Calendar and Manager inbox tabs, and the only one that can create new communities.
Your communities
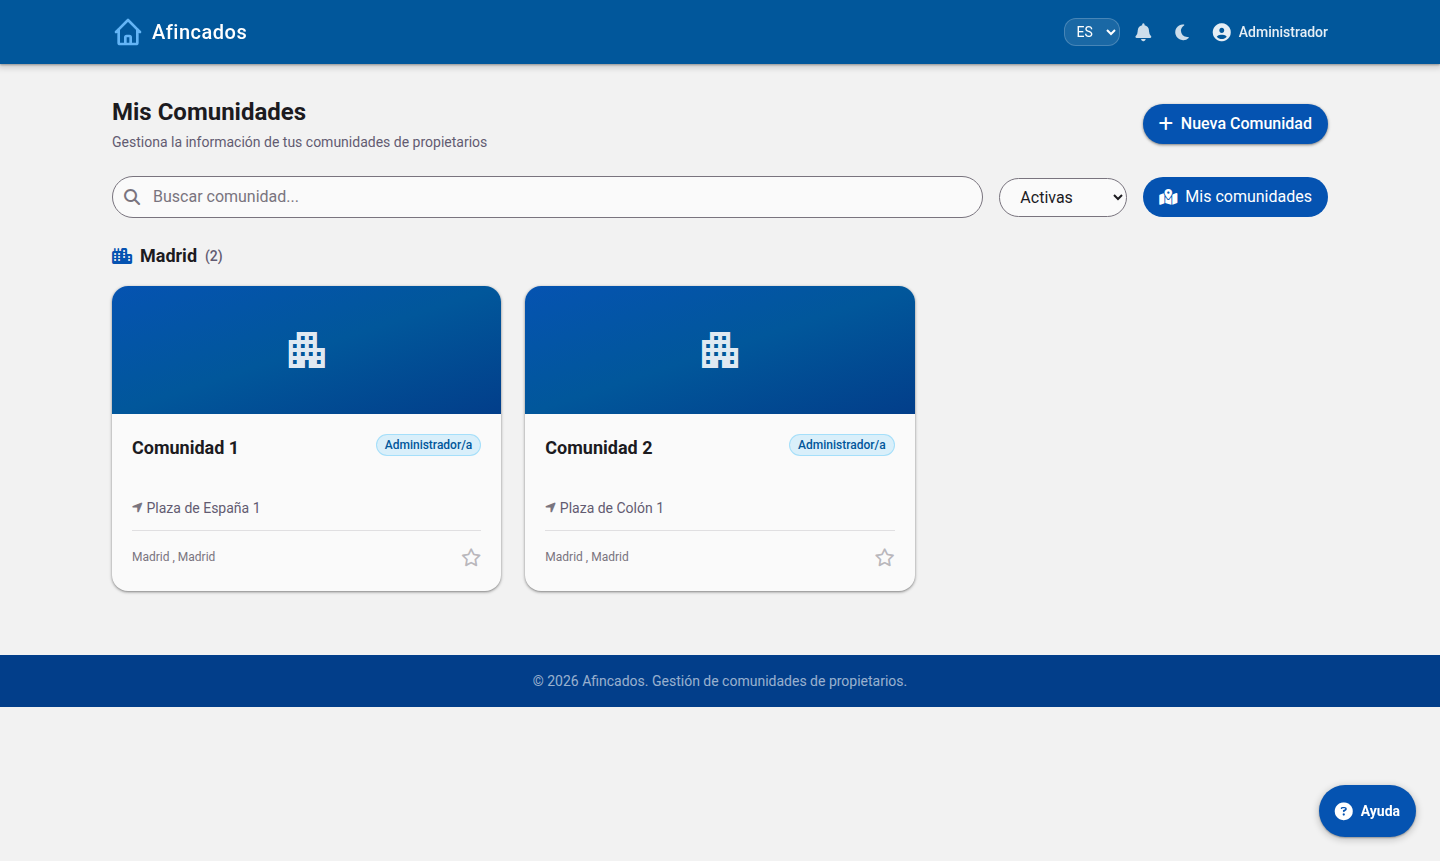
After signing in you land on My Communities, with one card per community you manage. The New Community button creates a community and starts the setup wizard.
Community list. The badge shows your role in each one.
Community tab
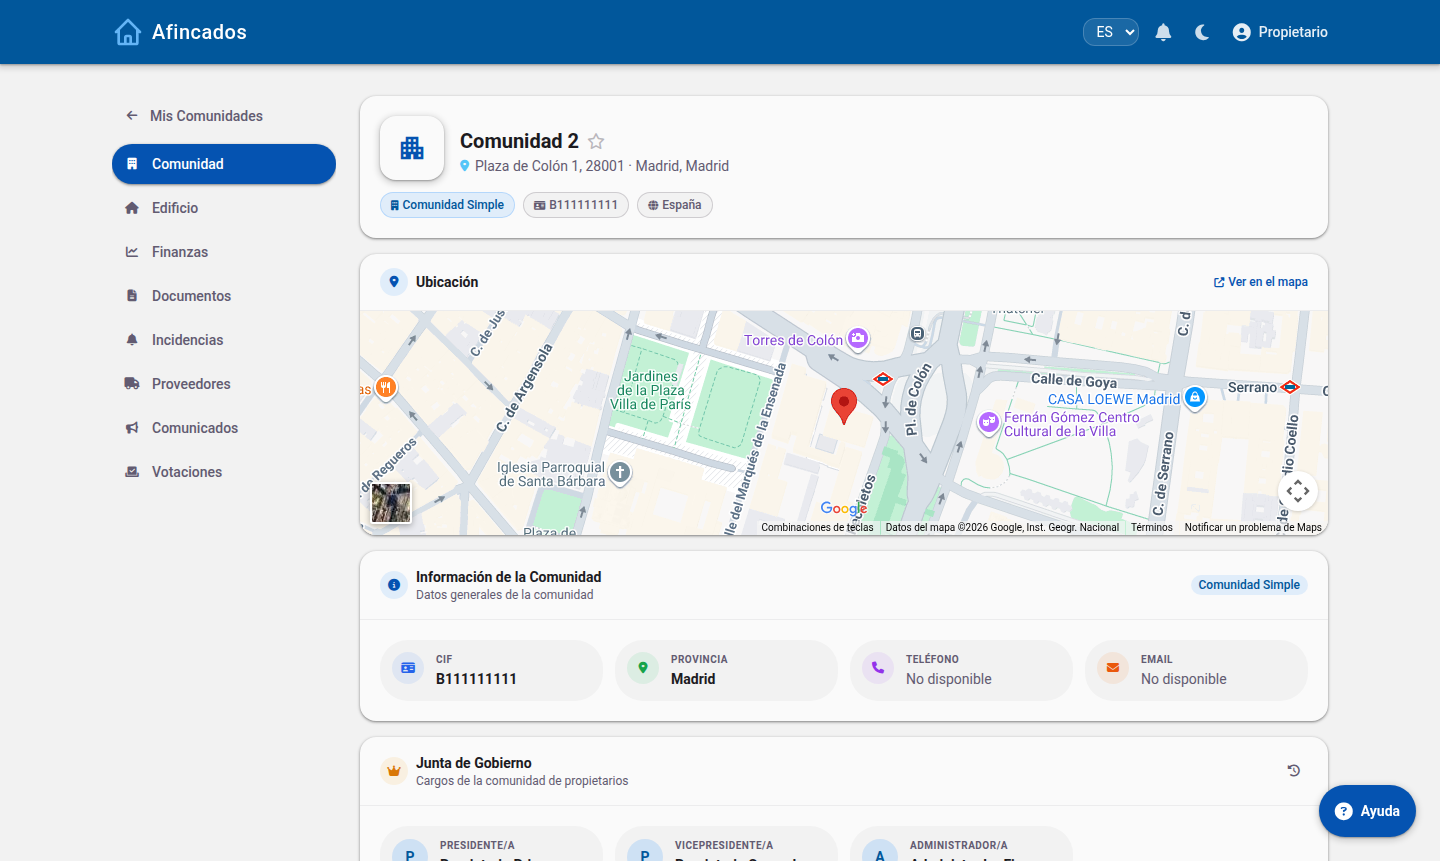
The general record: address, tax ID, cadastral reference, contact details, the board and the users. From here you add residents, assign board positions and edit the community details.
Manager view: the sidebar includes Tax, LPH Advisor, Calendar and Manager inbox.
Building tab
The physical structure: divisions (entrances, car parks…), properties and ownership shares. You can add properties one by one, import them from the Cadastre, upload a CSV, open the 3D model and export the list as PDF.
Divisions and ownership shares. Make sure the total adds up to 100%.
Finances tab
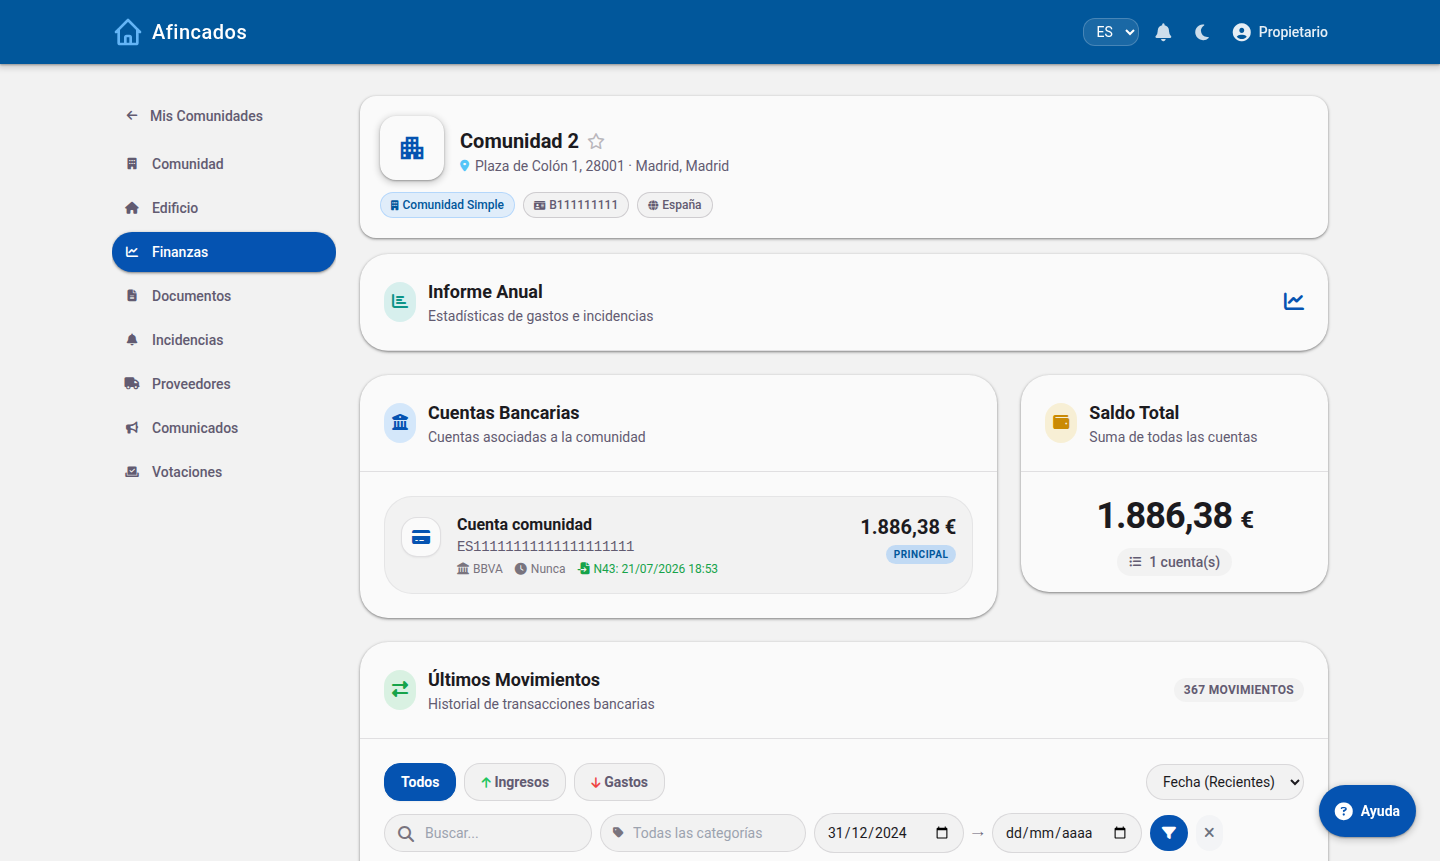
Bank accounts, transactions (with Norma 43 import), expense categorisation, ordinary and extraordinary fees, SEPA direct debits, arrears and the annual report.
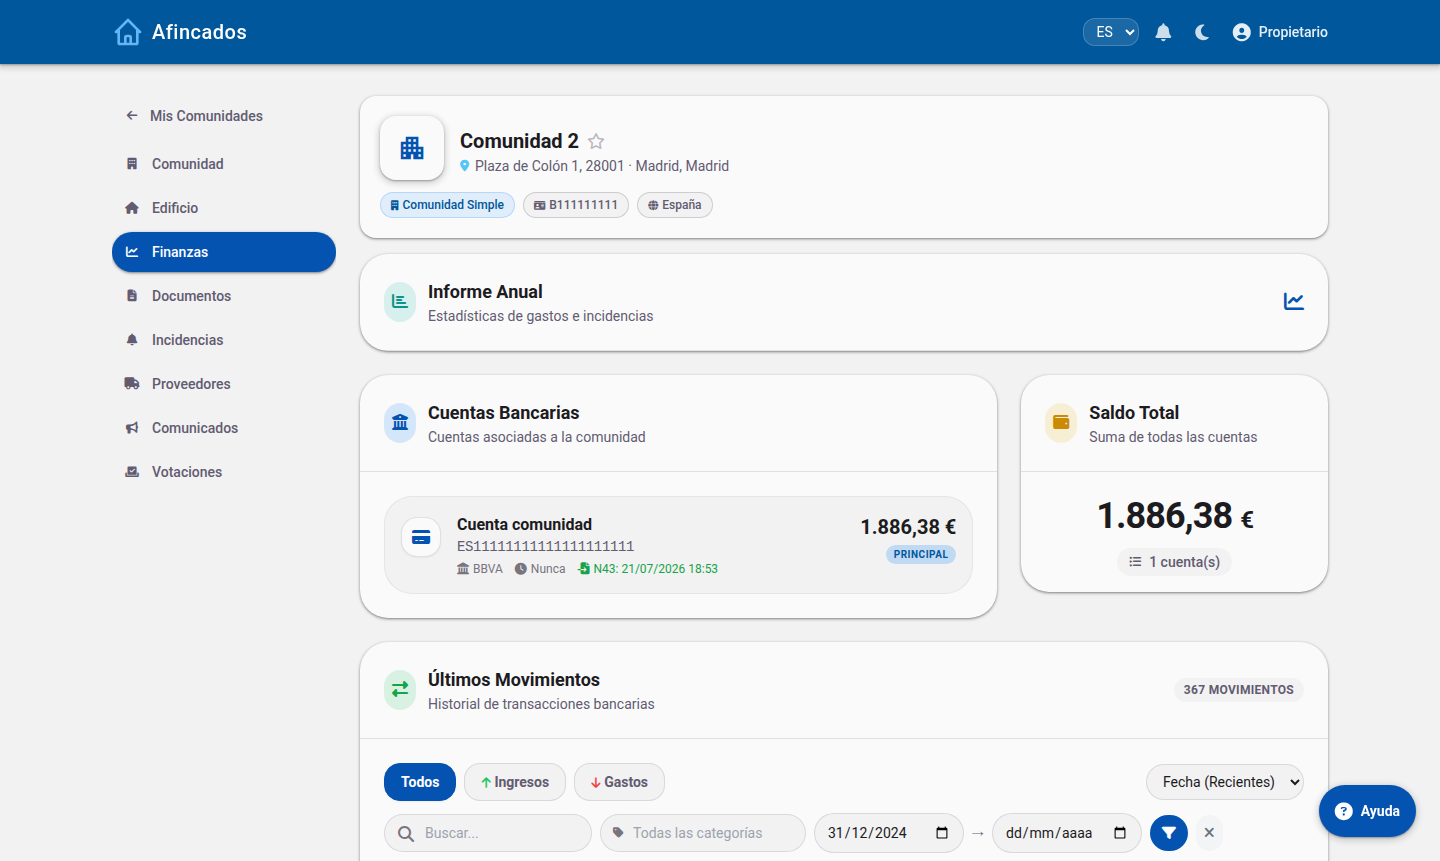
Accounts, total balance and shortcuts to the annual report and arrears analysis.
Tax tab (manager only)
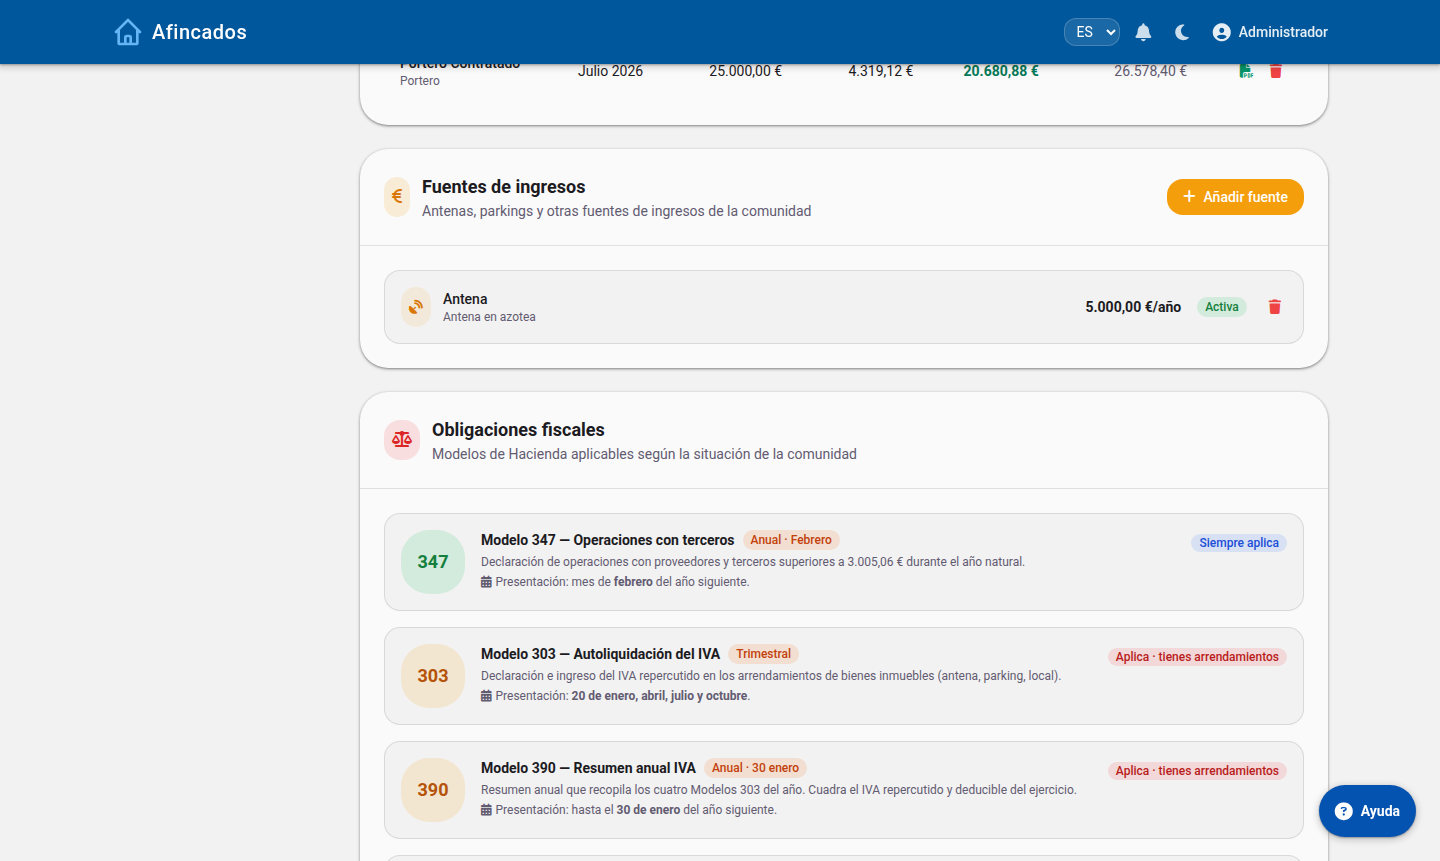
Exclusive to your role. It holds the staff on payroll (porters, caretakers), the monthly payslips with social security and income tax, other income sources and the community's tax obligations (forms 347, 111, 190, 303…).
Adding employees and generating payslips.
Generated payslips and the tax forms that apply to the community.
Incidents tab
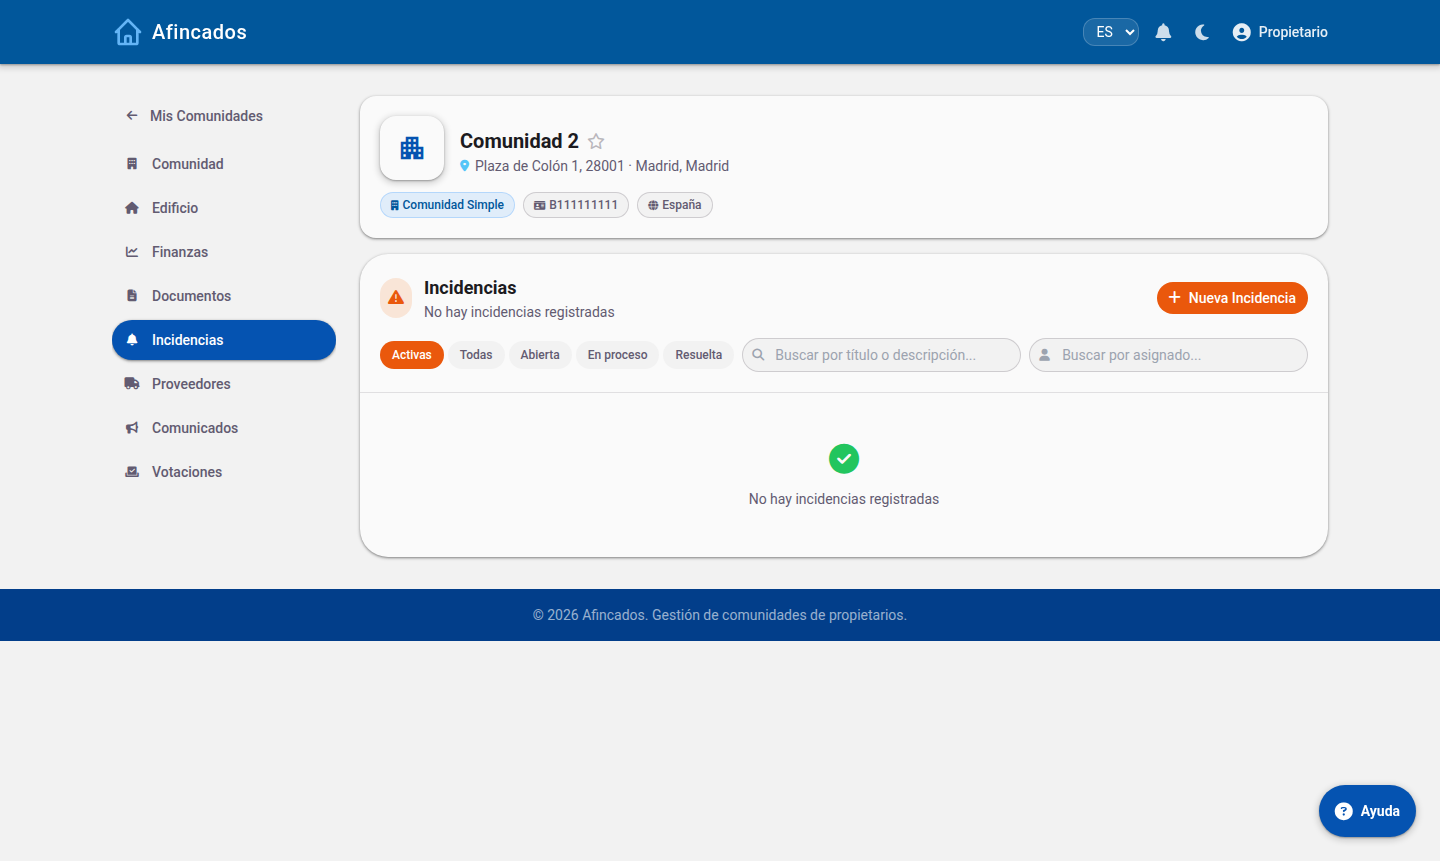
Every incident in the community, filtered by status (Active, All, Open, In progress, Resolved). You can create, edit, assign them to a supplier or a worker, and close them.
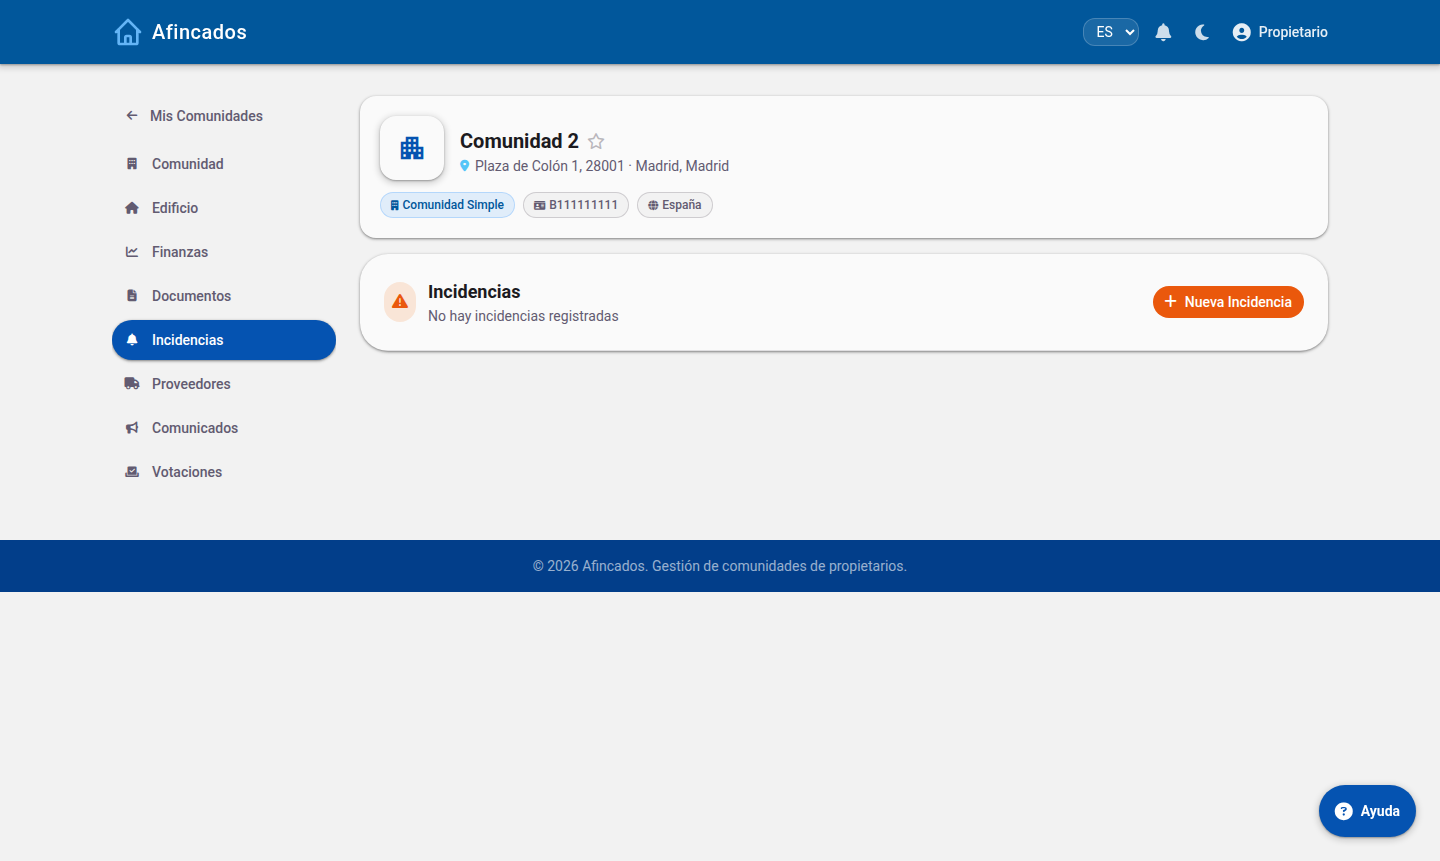
Only active incidents are shown by default: click «All» to see resolved ones too.
Suppliers tab
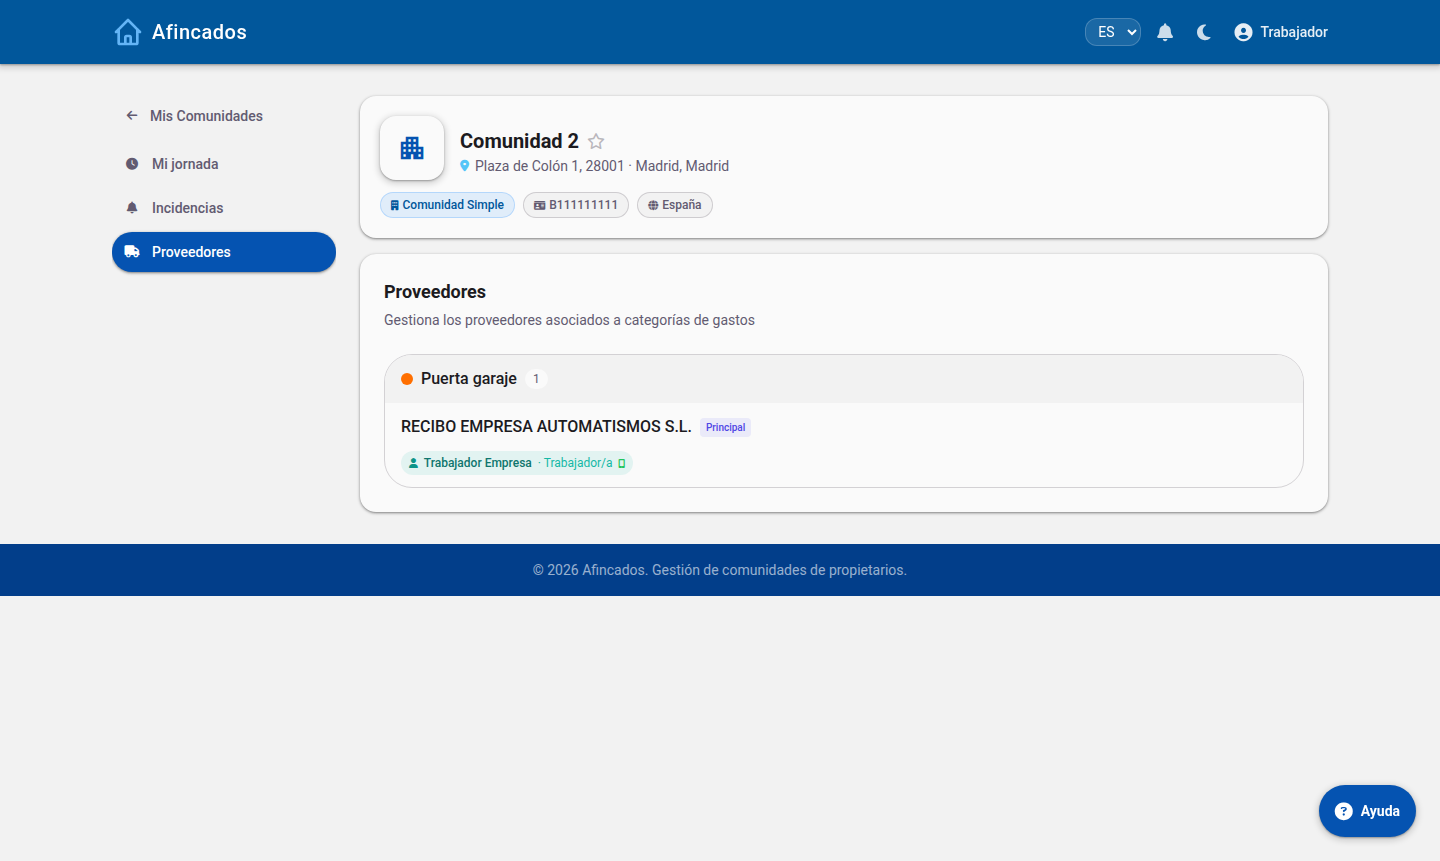
Suppliers grouped by expense category, with their schedules and the workers assigned to them. Detect suppliers suggests suppliers from your bank transactions.
Each supplier shows its shifts and the workers with access to the app.
Documents, announcements and votes
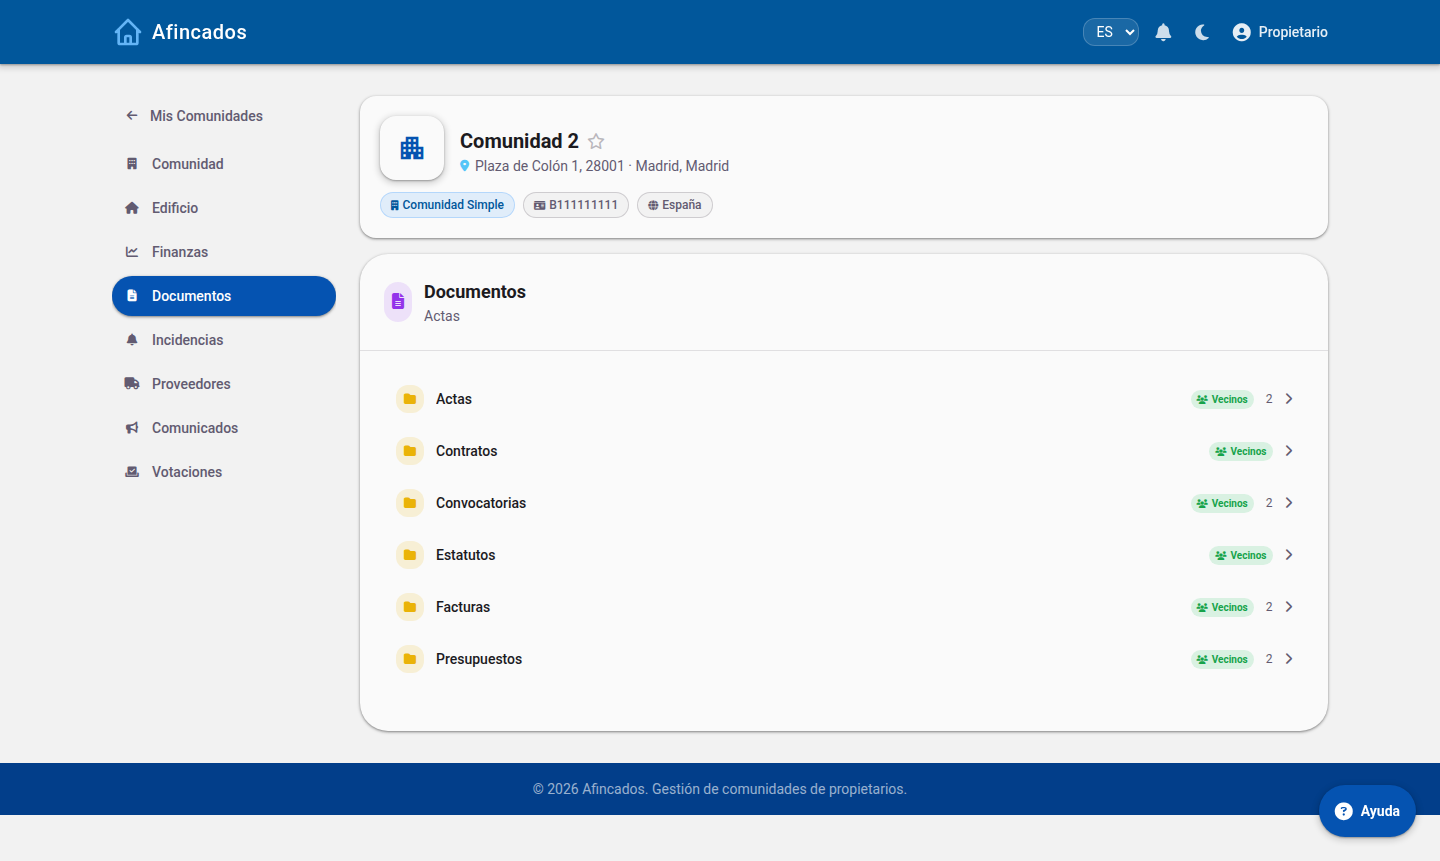
The «Residents» badge marks the folders owners can see.
Urgent announcements are highlighted in the residents' app.
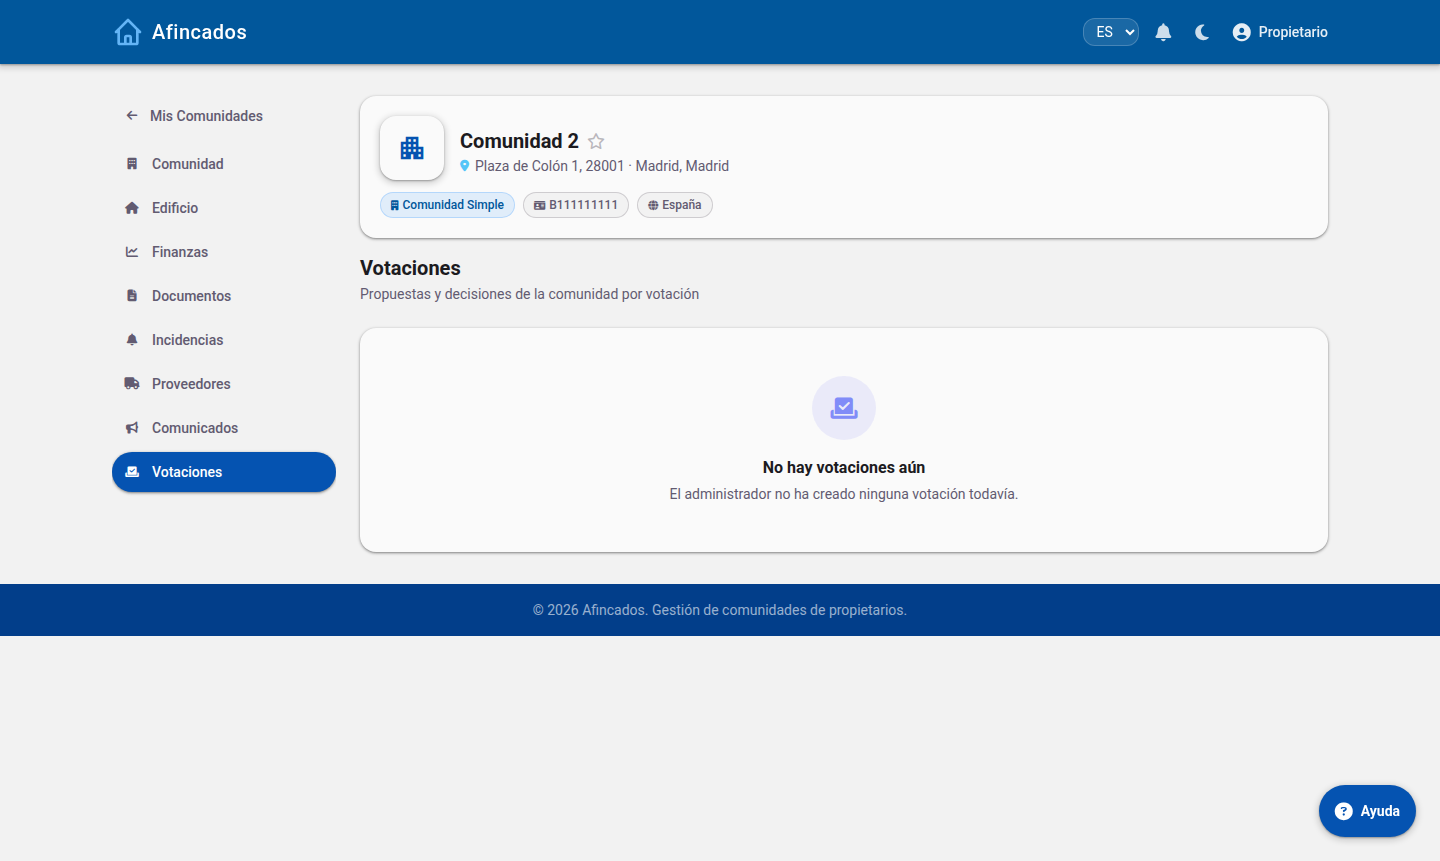
Live results and turnout by property.
LPH Advisor
An AI assistant for questions about the Spanish Horizontal Property Act. It is guidance only and does not replace professional legal advice.
Ask about the LPH; conversations are kept in the sidebar.
1.3 Resident guide
Updated on
15/09/2026
What you can check and do as an owner or tenant: fees, incidents, documents, announcements and votes.
As a resident you have read access to your community's information and you can take part: report incidents, vote and book facilities. Management tasks (creating fees, assigning incidents, uploading documents) belong to the property manager and the board.
Check the community's financial position: accounts, balance and transactions. It is a read-only view.
Residents see balances and transactions but not the manager's actions.
Incidents
You can report an incident and follow its status until it is resolved.
Click «New Incident», describe the problem and attach a photo if you can.
Documents, announcements and votes
Only folders shared with residents are shown.Community announcement history.Vote on open proposals and follow the results.
Your profile
Keep your phone and email up to date: meeting notices and urgent alerts go there.
What you cannot do
Create or change fees, direct debits and bank transactions.
Assign incidents to suppliers or close them.
Call meetings or publish minutes.
Add users or properties.
1.4 Worker guide
Updated on
15/09/2026
Clock in and out, check the incidents assigned to you and review your supplier's schedule.
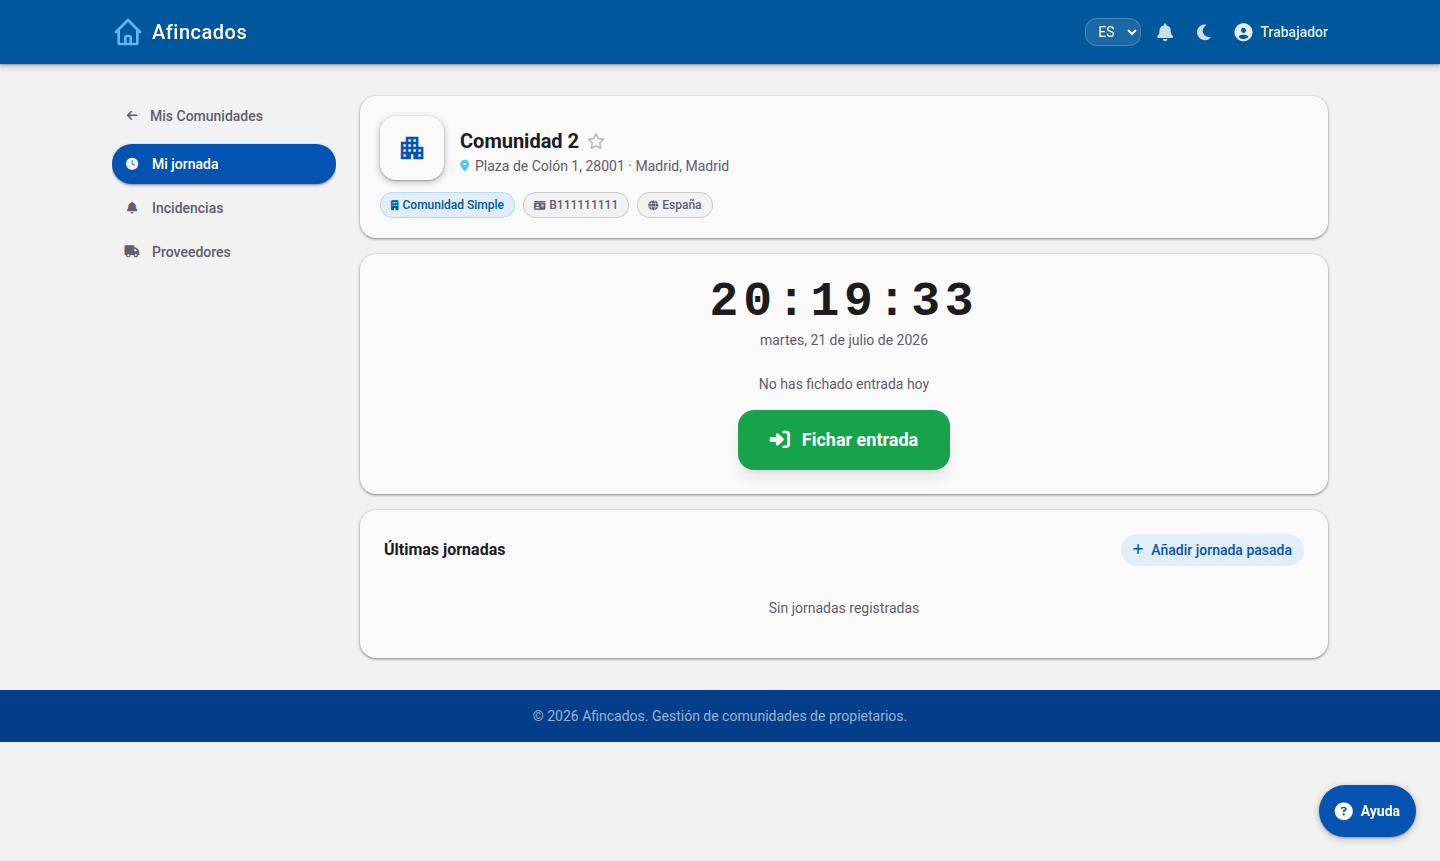
The worker role is for people providing a service in the community on behalf of a supplier (cleaning, maintenance, lifts…). It is a reduced view focused on their daily work: only three sections.
My shift
The main screen shows a clock and a large button to clock in and later clock out, plus the history of recent shifts with start time, end time and hours worked.
Clock in when you arrive and out when you leave. Forgot a day? Use «Add past shift».
The property manager can see and validate these shifts, so clock in punctually and fix any mistake as soon as possible.
Incidents
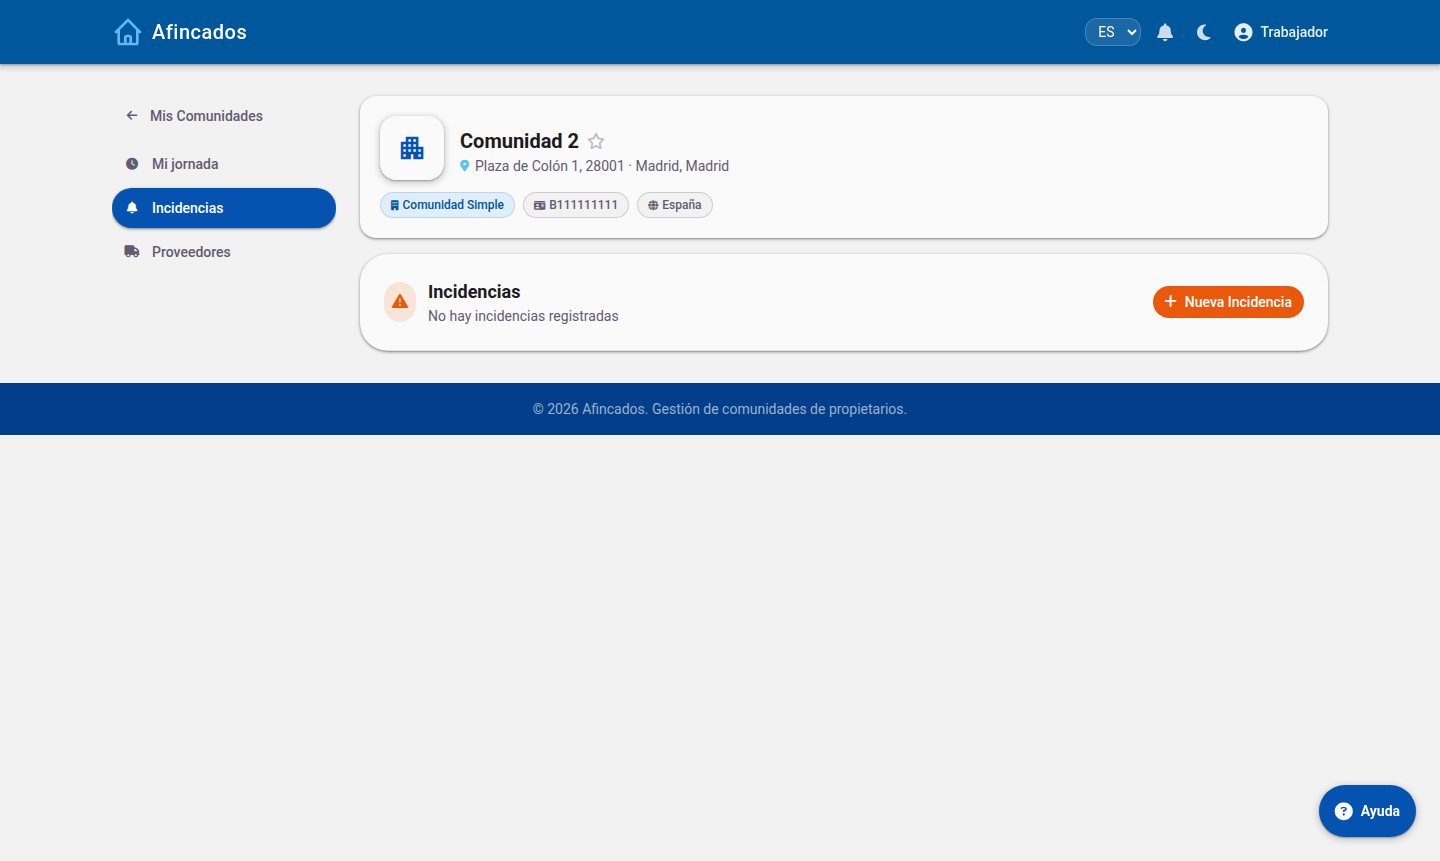
You only see the incidents assigned to you, grouped by status. You can also create a new incident if you spot a problem while working.
The sidebar counter shows how many incidents are pending.
Suppliers
Shifts by service category.
What you cannot see
Workers have no access to finances, documents, fees, votes or other residents' data. Access is limited to the communities where they provide a service.
2. Getting started
Sign in for the first time, set up your profile and learn your way around the app.
2.1 Finding your way around: communities and tabs
Updated on
13/09/2026
Get to know the community list, the community page and its working tabs.
The whole application revolves around the community. When you sign in you see the list of communities you belong to and, inside each one, a page with tabs where all the day-to-day work happens.
My Communities: one card per community, showing your role in each.
The community list
This is the screen you land on right after signing in. Each community shows its name, its address and a summary of its activity.
A resident will usually only see their own community here.
A property manager sees every community they manage and can search them by name.
Click the star icon to mark a community as a favourite so it always appears first.
The community page
Clicking a community opens its page, organised into tabs. You will see some or all of them depending on your role:
Overview: general details and recent activity.
Properties: the units, their owners and their ownership shares.
Users: the people registered in the community.
Fees: regular fees, extraordinary fees and payments.
Incidents: faults and their progress.
Meetings: meeting notices and minutes.
Documents: the community document archive.
Messages: conversations with the community.
Tabs load independently, so you can move between them without losing what you were looking at.
Language and appearance
The application is available in Spanish, English and Italian. You can change the language from the selector in the top menu; the interface, the emails and the documents you generate will follow the language you choose.
From My profile you can also switch on the dark theme, which is easier on the eyes in low light.
Notifications
The bell icon in the top menu shows your pending alerts: new meeting notices, replies to your incidents, published fees or messages received. Clicking an alert marks it as read and takes you straight to the content.
2.2 Signing in and completing your profile
Updated on
15/09/2026
Sign in for the first time, check your details and finish setting up your profile.
Your property manager or the president of your community creates your user account and emails you your credentials. This article explains how to sign in for the first time and get your profile properly set up.
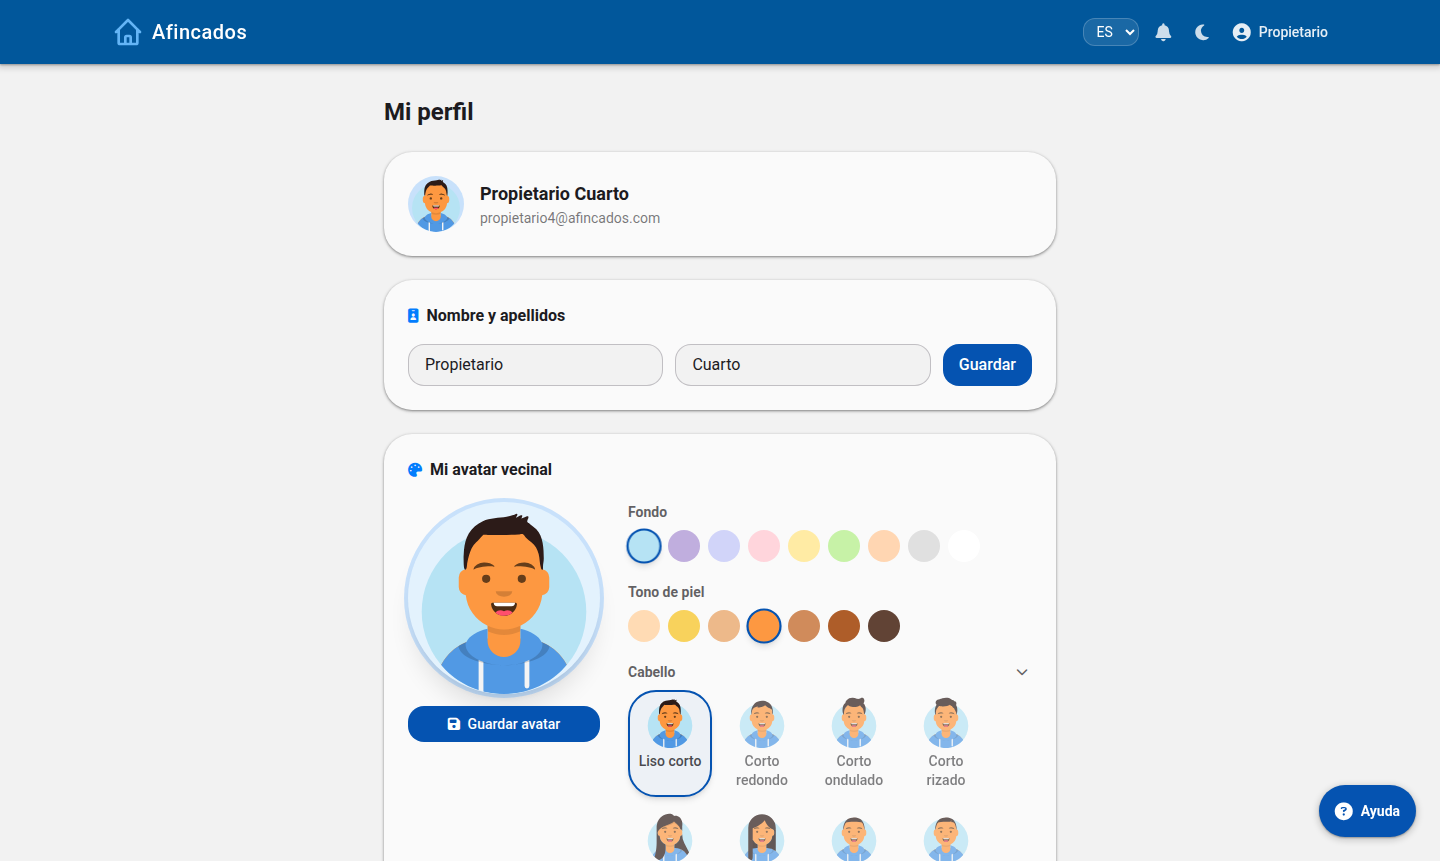
From «My profile» you update your phone, email, avatar and password.
Signing in
Open the application in your browser.
Enter the email address your account was created with and the password you received.
Click Sign in.
You can also sign in with your Google account using the corresponding button, as long as you use the same email address registered in the community.
Forgot your password?
Click Reset password on the sign-in screen, enter your email address and you will receive a link to set a new one.
Confirming your details
The first time you sign in, the application will ask you to review the details held by the community. Pay particular attention to:
Full name: it appears on minutes, meeting notices and notifications.
Email address: this is the channel used to send you notices and alerts.
Phone number: used for urgent community alerts.
If anything is wrong, correct it and save. If a field cannot be edited, contact your property manager.
Completing your profile
Go to My profile from the user menu in the top right corner. From there you can:
Change your name, phone number and email address.
Upload an avatar or profile picture.
Change your password.
Switch between the light and dark theme.
Security recommendations
Change the password you received by email as soon as you sign in for the first time.
Use a password you do not reuse on other services.
Do not share your credentials: every resident should have their own account.
3. Community
Creating and setting up the community, users, owners and the board.
3.1 Create community
Updated on
15/09/2026
Creating a community is the first step to connect your members, centralize communication, and manage everything efficiently. In this article we will guide you step by step so that you can have your new community ready in just a few minutes.
How to create a new community from scratch
Welcome! Creating a community is the first step to connect your members, centralize communication, and manage everything efficiently. In this article, we will guide you step by step so you can have your new community ready in just a few minutes.
Prerequisites
Before you start, make sure to meet the following requirements:
Have an active account in the application.
Have the necessary permissions (Administrator or Creator Role).
Step-by-step guide
Step 1: Access the creation panel
Log in to the application with your credentials.
In the left sidebar menu, go to the section"My Communities".
Click the button"Create Community"(located in the upper right corner).
Step 2: Configure the basic information
Fill out the initial form with your community's data:
Community name:Choose a clear and recognizable name for your members.
Description:Briefly explain the purpose of this space (maximum 250 characters).
Profile photo/Logo:Upload an image in PNG or JPG format to give it a visual identity.
Step 3: Define privacy and access
Select the type of community that best suits your needs:
Public:Any app user can search for it and join.
Private:Users can find it, but they must request access to enter.
Hidden:Access is only possible via a direct invitation from the administrator.
Step 4: Finalize the creation
Review that all the data is correct and click the button"Save and Create". Done! Your community is now active.
Recommended next steps
Once your community is created, we suggest taking the following actions to start off on the right foot:
Invite members:Go to the "Members" tab and add your users via their email or by sharing the invitation link.
Configure channels/forums:Create the first discussion spaces to keep the information organized.
Post a welcome message:Write a pinned post on the main board to greet the new members and explain the basic rules.
3.2 Creating users and importing owners
Updated on
15/09/2026
Create users one by one or import them in bulk from CSV and send them their credentials.
Users are the people who can access the community. You can create them one at a time or import the whole list of owners at once from a spreadsheet.
Users and owners are managed from the Community tab.
Creating a user
Open the community and go to the Users tab.
Click Create user.
Fill in name, email address and phone number.
Give them a role within the community: resident, president, vice-president, board member or administrator.
Link them to their property or properties.
Save. The system generates a password and emails them their credentials.
Importing owners from CSV
If the community is new, importing the full list is by far the quickest route.
On the Users tab, click Import.
Download the template the application provides. Keep the columns as they are and do not change the header row.
Fill in one row per owner with their name, email, phone number and the property they own.
Upload the file. You will see a preview with the detected rows and any errors found.
Fix whatever is needed and confirm the import.
The application does not duplicate users: if an email address already exists in the community, its details are updated instead of creating a second account.
Sending and resending credentials
Every user receives their credentials by email when their account is created. If a resident cannot find them or their email address has changed, open their record and click Resend credentials: a new password is generated and sent again.
Editing or removing
Edit: lets you change contact details, the role and the linked properties.
Delete: removes the user from the community. You can select several and delete them in bulk.
When a home is sold, the usual approach is to remove the previous owner and create the new one, linking them to the same property so the fee history stays attached to the unit.
3.3 High community
Updated on
15/09/2026
You can create your community here with an assistant that will guide you step by step.
Welcome! Creating a community is the first step to connect with your members, centralize communication, and manage everything efficiently. In this article, we will guide you step by step so you can have your new community ready in minutes.
From «New Community» you create a community and start the setup wizard.
Assistant for creating a new community
Prerequisites
Before you start, make sure to meet the following:
Have an active account in the application.
Have the necessary permissions (Administrator or Creator Role).
Step-by-step guide
Step 1: Access the creation panel
Log in to the application with your credentials.
In the left sidebar menu, go to the section"My Communities".
Click the button"Create Community"(located in the upper right corner).
Step 2: Configure the basic information
Fill out the initial form with your community's data:
Community Name:Choose a clear and recognizable name for your members.
Description:Briefly explain the purpose of this space (maximum 250 characters).
Profile Photo/Logo:Upload an image in PNG or JPG format to give it visual identity.
Step 3: Define privacy and access
Select the type of community that best suits your needs:
Public:Any app user can search for it and join.
Private:Users can find it, but they must request access to enter.
Hidden:Access is only possible through a direct invitation from the administrator.
Step 4: Finalize creation
Review that all the data is correct and click the button"Save and Create". Done! Your community is now active.
Recommended next steps
Once you have created your community, we suggest performing the following actions to start off on the right foot:
Invite members:Go to the "Members" tab and add your users via their email or by sharing the invitation link.
Configure channels/forums:Create the first discussion spaces to keep the information organized.
Post a welcome message:Write a pinned post in the main board to greet the new members and explain the basic rules.
3.4 Managing the community board
Updated on
13/09/2026
Appoint the president, vice-president and board members, and review the history of appointments.
The community board holds the offices elected by the community. Beyond recording who holds each post, it also determines what each person can do inside the application: board members see the financial information and can act on incidents, meetings and minutes.
The «Board» block shows current positions and their history.
Available offices
President: represents the community, calls the meetings and signs the minutes.
Vice-president: stands in for the president when absent.
Board member: supports the board and helps follow up on agreements.
Administrator: the property manager, with full access to the management features.
Appointing or changing an office
Open the community and go to the Board tab.
Click Edit board.
Pick the office and, in the search box, the person who will hold it. Only users already registered in the community appear.
Enter the start date of the term, which normally matches the meeting where the appointment was approved.
Save.
When you assign an office, that person automatically receives the matching permissions: there is no need to change their role by hand.
Annual renewal
When the community renews its board, do not delete the previous holders: assign the new office with its start date and the application will close the previous term and store it in the history. That keeps a clear record of who was president at any given time, which is especially useful when reviewing old minutes.
Reviewing the history
From Board history you can see every office the community has had, along with its term. This is where you check who signed a particular set of minutes or who chaired the community in a past financial year.
Deleting an office
The Delete option should only be used when an appointment was entered by mistake, because it removes the record from the history. For a normal handover, appoint the successor rather than deleting the previous office.
3.5 Setting up a community with the wizard
Updated on
13/09/2026
Get a new community ready: tax details, blocks, properties and bank accounts.
Once the community has been created, the setup wizard walks you through everything needed to make it operational: tax details, building structure, owners and bank accounts. You can leave at any point and pick up where you left off.
Once the wizard finishes, the community has its record, location and general details.
Before you start
You need the administrator role in the community.
Have the community tax number and its full address to hand.
Have the community IBAN ready and, if you plan to use direct debits, the SEPA creditor identifier.
Step-by-step guide
Step 1: General details
Fill in the identification of the community:
Name: the one that will appear on minutes, fees and communications.
Tax number: required to issue direct debits and file tax forms.
Address, postcode, city and country.
Land Registry reference, if you want to import Land Registry data later.
Step 2: Building structure
Define how the community is physically organised: blocks or divisions, and the floors in each one. You will later use this structure to group properties and to split costs by division.
Step 3: Properties and owners
Register the units (flats, commercial premises, garages and storage rooms) with their ownership share. You can create them one by one, import them from a CSV file, or pull them straight from the Land Registry.
Step 4: Expense categories
Review the expense categories (cleaning, lift, maintenance, insurance and so on). Each category can be split across every property or only across those in a specific division, which lets you have costs paid, for example, only by the residents who have a lift.
Step 5: Bank accounts
Add the community bank account or accounts. You will be able to link them to the bank to sync transactions automatically, or import statements in Norma 43 format.
When you are done
Once you close the wizard the community is fully operational. The recommended next steps are:
Invite the residents and send them their credentials.
Appoint the board (president, vice-president and board members).
Calculate the fees for the financial year.
Everything you entered can be changed later from Edit community.
4. Properties and buildings
Units, ownership shares, blocks, floors, Land Registry data and the 3D building view.
4.1 Adding properties and importing from the Land Registry
Updated on
15/09/2026
Create the units with their ownership shares or pull them straight from the Land Registry.
Properties are the foundation of the whole financial side: expenses are split across them according to their ownership share, and that is where each resident fee comes from. It is worth taking your time here so you do not have to correct fees later.
From the Building header you add properties, import from the Cadastre or upload a CSV.
Creating a property
Open the community and go to the Properties tab.
Click Create property.
Enter its identifier (for example, "3rd floor B" or "Unit 2") and the block or division it belongs to.
Select the type: flat, commercial premises, garage or storage room.
Enter the ownership share, which determines what portion of each expense it carries.
Assign the owner, if they are already registered as a user.
Save.
The ownership shares of all properties must add up to 100. The application warns you if they do not.
Importing from the Land Registry
If you know the Land Registry reference of the building, you can skip creating units by hand:
On the Properties tab, click Query Land Registry.
Enter the Land Registry reference of the building.
The application queries the Land Registry and lists every unit found, with its floor area and its use.
Review the list, tick the ones you want to bring in and click Import.
The properties are created with the registry data already filled in. All that is left is to adjust the ownership shares and assign owners.
Importing from CSV
You can also upload a file with the full list of units. Download the template from Import properties, fill it in and upload it; you will see a preview before confirming.
Bulk operations
Once you have a lot of properties, select them with the checkboxes on the left and apply changes to all of them at once:
Assign division: move several units to the same block.
Change type: for example, mark every garage on a floor.
Assign expense categories: define which costs affect that group of properties.
Delete: remove several units in one go.
Before you calculate fees
Check that every property has an ownership share, an owner and the right expense categories. If a garage should not pay for the lift, remove that category from it: this is how you make the split of costs match what the community agreed.
4.2 Buildings, floors and the 3D view
Updated on
15/09/2026
Define blocks and floors, and view the community in 3D to pinpoint incidents.
The buildings and floors structure is the community floor plan inside the application. It is used to group properties, split costs by division and, above all, to pinpoint incidents visually on a 3D model.
Each division (entrance, car park…) groups properties and adds up its share.
Creating a building or division
Open the community and go to the Buildings tab.
Click Create building.
Give it a name (for example, "Block A" or "Building 1").
Enter the number of floors, including basements and the ground floor where applicable.
Save.
You can reorder buildings by dragging them, so they appear in the same order as in real life.
Floors
Within each building you define its floors and the properties on each one. If every floor is identical, create the first one and use Duplicate floor: its layout is copied and all you have to do is rename the units.
The 3D view
The View in 3D button opens an interactive model of the building. You can rotate it, zoom in and click on any unit or common area.
Its main use is working with incidents: when reporting a fault you can mark it directly on the 3D model, so the supplier knows exactly where the problem is with no need for explanations. Open incidents appear flagged on the model.
Adjusting the appearance
Labels: show the identifier of each unit on the model.
Settings: let you adjust floor height, colours and orientation so the model resembles the real building.
KML: if you have a KML file with the geometry of the building or the plot, you can upload it so the representation matches the plan.
Inventory
Each division can have its own inventory of common items: boilers, lifts, fire extinguishers, irrigation pumps and so on. Recording them lets you generate QR labels to stick on the equipment. Scanning the QR code opens the public record of that item, with its history of inspections and incidents.
Exporting
The Export to PDF button produces a document with the full structure of the building and its properties, handy to attach to a meeting notice or hand to a supplier.
5. Fees and finances
Regular and extraordinary fees, SEPA direct debits, banking, arrears and reports.
5.1 Annual report and AI financial analysis
Updated on
15/09/2026
Produce the year-end accounts as PDF or PowerPoint and get an automatic analysis.
The annual report brings together all the accounts for the financial year: what was budgeted, what was spent, what came in and the final result. It is the document presented to residents at the ordinary meeting to approve the accounts.
The «Annual report» block gathers the year's expense and incident statistics.
Producing the report
Open the community and go to the Finances tab.
Click Annual report.
Select the financial year you want to analyse.
The screen shows the summary: expenses by category, income from fees, a comparison against the budget and the closing balance. You can break it down by division (to see what each block spent) or by owner (to see what each one contributed).
Exporting
PDF: the formal accounts document, ready to attach to the meeting notice.
PowerPoint: a slide deck with the headline figures and charts, meant to be projected during the meeting.
Excel: the raw data, in case you need to work with it.
Artificial intelligence analysis
The AI analysis option reviews the year's accounts and writes a plain-language report highlighting:
The variances against the budget and which categories they came from.
Unusual expenses or ones that have shot up compared with previous years.
How arrears have evolved and their impact on cash flow.
Recommendations for next year's budget.
It is a good starting point for preparing what you will say at the meeting, though you should review its conclusions before presenting them: the AI analyses the data held in the application, so anything you have not recorded will not be taken into account.
Custom questions
With Custom query you can ask about the community accounts in plain language ("how much have we spent on plumbing over the last three years?") and download the answer as a PDF.
Who can access it
The report is available to the property manager and to board members. If you want every resident to see it, export it to PDF and upload it to the community Documents tab.
5.2 Bank accounts, transactions and Norma 43
Updated on
14/09/2026
Add the community account, sync it with the bank and import statements.
Linking the community bank account means transactions flow into the application on their own and resident payments are reconciled against their fees automatically.
Each account shows its balance, bank and the date of the last N43 file imported.
Adding an account
Open the community and go to the Accounts tab.
Click New account.
Enter the IBAN and give it a name that identifies it (for example, "Main account" or "Reserve fund").
Select the bank from the list.
Save.
A community can have several accounts; they all appear on the tab with their current balance.
Connecting to the bank
To have transactions download on their own, click Sync on the account. You will be redirected to your bank website to authorise read-only access. Once authorised:
Transactions are downloaded automatically.
Incoming payments are matched against outstanding fees, which are then marked as paid.
The account balance stays up to date.
Banking regulations make the authorisation expire periodically; when that happens, click Sync again to renew it.
Importing a statement (Norma 43)
If your bank does not support a direct connection, you can download the statement from its website in Norma 43 format (a text file every Spanish bank offers) and import it:
On the account, click Import Norma 43.
Select the file downloaded from the bank.
Review the preview of the detected transactions.
Confirm the import.
The application skips transactions that were already recorded, so you can import overlapping statements without creating duplicates.
Manual entries
To record a transaction the bank does not have (a cash payment, an accounting adjustment), click New entry on the account and enter the date, description and amount. If an entry is wrong, you can delete it from the transaction list.
Deleting an account
The Delete account option removes the account and its transaction history from the community. It cannot be undone, so only use it for accounts created by mistake or already closed at the bank.
5.3 Calculating, editing and deleting regular fees
Updated on
15/09/2026
Split the annual budget across the properties and publish each resident fee.
The regular fee is what each owner pays periodically to cover the running costs of the community. The application works it out for you: you enter the budget and it splits it across the properties according to their ownership share and the expense categories assigned to them.
Fees are calculated and reviewed from the Finances tab.
Before you start
Every property must have its ownership share, and they must add up to 100.
The expense categories must be created and assigned to the relevant properties.
You need the budget approved at a meeting.
Creating the fees
Open the community and go to the Fees tab.
Click Calculate fees.
Select the financial year and the frequency: monthly, quarterly or annual.
Enter the budgeted amount for each expense category (cleaning, lift, insurance and so on).
Click Calculate. You will see a preview of what each property would pay, with nothing saved yet.
Review the table. If the split looks right, click Save to publish the fees.
As soon as you save, every resident sees their fee on their record and receives a notification.
Editing the fees
You can change the amounts while the financial year is still open:
Recalculate: go back to Calculate fees, change the budget and save. The fees for that year are replaced by the new ones.
Adjustment: the Fee adjustment option applies a percentage increase or decrease to every fee at once, without touching the budget. This is what you use when the meeting approves, say, a 5% rise. Before applying it you can generate a simulation PDF to present at the meeting.
Individual fee: from a property record you can adjust that particular fee without affecting the others.
Deleting a fee
If you got the calculation wrong, open the fee and click Delete. This removes the fees of every property for that period, so only do it if they have not been charged yet. If you have already generated a bank direct debit file, cancel that first.
Reviewing and exporting
History: shows the fees of previous financial years, useful for comparing how they have evolved.
Export to PDF or Excel: produces the fee table so you can attach it to the minutes or send it to residents.
Import CSV: if you keep the fees in a spreadsheet, you can upload them instead of calculating them.
5.4 Checking your fees and setting up direct debit
Updated on
15/09/2026
See what you pay, review your history and add or change your bank account.
As an owner you can check at any time what you pay the community, whether you have any outstanding receipts and which bank account is charged. Only you and the property manager can see your financial details: no other resident has access to them.
As a resident you can check balances and transactions, without management actions.
Viewing your fees
Open your community.
Go to the Fees tab.
You will see your current fee, how often it is charged (monthly, quarterly or annually) and the breakdown by item: how much of your fee goes to cleaning, how much to the lift, how much to insurance. Any extraordinary levies that apply to you also appear here, if the community has approved one.
Each receipt shows whether it is paid or outstanding. The history lets you look up what you paid in previous financial years.
Adding your bank account
For the community to charge you by direct debit it needs your IBAN.
On the Fees tab, click My bank account.
Enter the IBAN of the account you want the receipts charged to.
Save.
The property manager is notified and will validate the account. From the next direct debit run onwards, receipts will be charged there.
Changing or removing the account
You can change your IBAN whenever you like from the same screen: overwrite the previous one and save. Do it well before the charge date, because a run already sent to the bank cannot be redirected to another account.
If you would rather stop paying by direct debit, clear the IBAN and let the property manager know so you can agree another payment method.
If a receipt was returned
It will show as outstanding again. Check that your IBAN is right and that the account had funds, correct it if needed, and contact the property manager through the Messages tab to agree how to settle it.
If you disagree with your fee
The fee is calculated automatically from your property's ownership share and the budget approved at the meeting. If you think there is a mistake, write to the property manager from Messages explaining which item does not add up: they can review the ownership share and the expense categories assigned to your unit.
5.5 Creating and managing extraordinary levies
Updated on
13/09/2026
Split a one-off cost, such as building works, across the owners and track its collection.
An extraordinary levy pays for a one-off cost that was not in the budget: renovating the façade, replacing the lift, fixing a major fault. It is split across the properties just like the regular fees, but it is separate from them and charged on its own.
Special levies are created from Finances, next to the ordinary fees.
Creating a levy
Open the community and go to the Fees tab.
Click New extraordinary fee.
Give it a clear description: it is what the resident sees and what appears on the receipt (for example, "Façade levy 2026").
Enter the total amount to be shared out.
Choose how it is split:
By ownership share: each property pays according to its share. This is the usual choice.
Equally: every property pays the same.
Only one group: for example, only the flats in one block or those that use the lift.
State whether it is charged in one go or in instalments, with its start date.
Review the preview of the split and click Save.
The owners affected receive a notification and see the levy alongside their fees.
Editing a levy
Open the levy and click Edit. You can change the description, the amount, the split or the number of instalments. If you change the amount, the application recalculates what each property owes.
Take care if some instalments have already been charged: only change the outstanding ones so what has been paid still adds up.
Individual additional fees
If you need to charge something to a single owner (a repair they are liable for, a private consumption), do not create a levy: use Additional fee from their record. You can also apply it to several owners at once with the bulk additional fee option.
Deleting a levy
From the fee list, open the levy and click Delete. It is removed for every property and cannot be recovered. Only do this if it was created by mistake and has not been charged yet.
Documenting and collecting
Levy PDF: produces a document with the split property by property, ideal to attach to the minutes that approve it.
Direct debit: once created, you can generate a bank file to collect it by direct debit, just like the regular fees.
5.6 Generating SEPA direct debits and recording payments
Updated on
13/09/2026
Collect the fees by direct debit and track who has paid and who has not.
A direct debit run is the file you send to the bank to collect the fees of every owner on direct debit in one go. The application generates it in the SEPA format banks accept.
The SEPA file is generated against the community's main account.
Before you generate it
The community must have its tax number and its SEPA creditor identifier, which your bank provides.
Every owner paying by direct debit must have their IBAN on record.
The fees for the period must be calculated and saved.
Generating the file
Open the community and go to the Fees tab.
Find the fee or levy you want to collect and click Generate direct debit.
Enter the charge date: the day the bank will take the payments.
Review the list of payments included. The application leaves out anyone without an IBAN and warns you about it.
Click Download. You get an XML file.
Upload that file to the community online banking.
The Direct debit report button produces a PDF with every payment and its amount, handy for your records and for reconciling with the bank.
Recording payments
The Payments tab shows, for each property, whether its fee is paid or outstanding.
Click the indicator on a fee to mark it as paid or set it back to outstanding. It is a toggle: use it both to record a payment and to undo it if you made a mistake.
If your bank account is linked, payments are reconciled automatically when transactions are synced, so you will not have to mark them by hand.
Returned payments
When the bank returns a payment, set it back to outstanding on the payments tab. That fee counts as unpaid again and the owner will start appearing in the arrears tracking, where you can manage the claim.
Analysing a run with AI
The Analyse direct debit option lets you upload the response file from the bank (or a PDF listing the returned payments) so the application can automatically work out which payments were rejected and update their status, saving you from checking them one by one.
5.7 Spanish tax forms 347, 111, 190 and 303
Updated on
14/09/2026
Prepare the community tax returns from the expenses already recorded.
The application prepares the tax forms the community has to file, using the expenses, suppliers and withholdings you have already recorded. It does not file them with the tax office for you, but it gives you the figures calculated and checked.
The app flags which forms apply given the community's situation.
Before you start
The community must have its tax number filled in.
The expenses for the year must be recorded, with their supplier and amount.
Suppliers must have their tax number, otherwise they cannot be included in the information returns.
The available forms
Form 347: annual declaration of transactions with third parties. It covers suppliers the community paid more than €3,005.06 over the year.
Form 111: withholdings and payments on account made (for example, to the caretaker or to professionals), filed quarterly.
Form 190: the annual summary of those same withholdings.
Form 303: VAT self-assessment, for communities carrying out taxable activities.
Producing a form
Open the community and go to the Finances tab.
Click Tax forms and pick the one you need.
Select the financial year and, if the form is quarterly, the quarter.
The application works out the amounts and shows the breakdown by supplier.
Check the figures and download the result to transfer it into the tax office form.
Check before you file
The calculation is only as good as the data recorded. Before treating a form as final, check that:
Every expense in the period has been entered, including those paid in cash.
No supplier is duplicated across two separate records, because their amounts would then be split and might fall below the form 347 threshold.
The supplier tax numbers are correct.
If you spot a mistake, fix the expense or the supplier record and produce the form again: it is recalculated with the updated data.
5.8 Tracking arrears
Updated on
13/09/2026
See who owes fees, log your collection efforts and prepare the claim.
The arrears section brings together the owners with outstanding fees and lets you record every collection effort, which is essential if the community ends up claiming the debt through the courts.
The «Arrears analysis» block reads the PDFs of your bank direct debits.
Who can see it
The property manager and the board members. Residents do not see other owners' debts: each one only sees their own.
Reviewing the debtors
Open the community and go to the Finances tab.
Click Arrears.
You get a list with each owner in debt, the total outstanding amount, the number of unpaid receipts and how old the oldest debt is. You can sort by amount to tackle the worst cases first.
Clicking an owner opens the detail: exactly which fees they owe and since when.
Logging a collection effort
Every time you contact a debtor, write it down. This is how you show the community tried to collect before making a claim.
Open the debtor's detail.
Click Add note.
Write down what you did: a phone call, a recorded delivery letter, an agreement to pay in instalments, and so on.
Save. The note is stamped with the date and your user.
Notes can be edited if you made a typo and deleted if they were created by mistake, but it is best not to erase the history of genuine collection efforts.
Cross-checking against documents
The Analyse option lets you upload a PDF (for example, a list of returned payments from the bank) so the application reads it and automatically matches the unpaid items to the owners, updating the status of their fees without you having to go through them one by one.
When the resident pays
Mark their fees as paid on the Payments tab. The owner drops off the debtor list automatically as soon as their debt reaches zero. If they had an instalment agreement, add a note recording that it was fulfilled.
6. Incidents
Report faults, track them, assign suppliers and approve the work done.
6.1 Assigning, resolving and approving incidents
Updated on
15/09/2026
Hand the fault to a supplier, follow the work and approve the hours worked.
When a resident reports a fault, the property manager and the board are the ones who move it forward: they decide whether it stands, assign it to a supplier and approve the work once it is finished.
Active incidents are listed by default: click «All» to include resolved ones.
Seeing the open incidents
The community Incidents tab shows all the incidents for that community. If you manage several, the All incidents view shows those of every community you manage on a single screen, so you can prioritise by urgency rather than by community.
You can search and filter by status, category or date.
Assigning to a supplier
Open the incident.
Click Assign.
Select the supplier from the community list. If the supplier has workers registered, you can assign it directly to a specific worker.
Add instructions if needed and confirm.
The supplier receives an alert with the description, the photos and the location (including its position on the 3D model, if the resident marked it). The incident moves to Assigned and the resident who reported it is notified.
To change supplier, click Assign again and pick another one: the incident is reassigned without losing its history or its comments.
Resolving and closing
When the work is done, open the incident and click Resolve. Add a closing note explaining what was done: this is what the resident sees and what stays in the community history.
If the fault comes back, it is better to reopen the existing incident than to create a new one, so it is clear the problem is recurring.
Approving work logs
Workers record the hours they spend on each incident. Those work logs sit awaiting your approval before they can be invoiced.
Open Pending work logs in the community.
Review each sheet: who worked, on which incident, how many hours and what they did.
Click Approve if it is correct, or reject it stating the reason if the hours do not match the work done.
The work log report gives you the total hours per supplier and period, useful for checking an invoice before paying it.
Deleting an incident
Only duplicate incidents or ones created by mistake should be deleted. A genuine fault, even one that never gets repaired, is better closed with an explanatory note: the incident history is valuable information when you have to justify a levy or negotiate with a supplier.
6.2 Reporting an incident and tracking its progress
Updated on
13/09/2026
Report a fault with photos, pinpoint it on the building and follow it through to resolution.
When something breaks in the common areas (the entrance, the lift, the pool, the garage), do not report it in a message: create an incident. That way it is logged, the property manager can assign a supplier to it and you can follow its progress at any time.
Click «New Incident» to report a problem and follow its status here.
Creating an incident
Open your community and go to the Incidents tab.
Click New incident.
Write a short, clear title ("The automatic entrance door will not close").
Choose the category: plumbing, electrics, lift, cleaning, gardening and so on. It is used to alert the right supplier.
Describe the problem in the details: what happens, since when and at what times.
Enter the location: the block, the floor or the common area affected.
Attach photos. This is what helps most: one picture saves visits and explanations.
Save.
The property manager and the board are alerted as soon as you create it.
Pinpointing it on the 3D model
If your community has the 3D model set up, you can use New incident in 3D: rotate the building, click the exact spot where the problem is, and the incident is flagged there. The supplier will know where to go without anyone having to show them.
Tracking its progress
Every incident moves through several statuses, shown on its record:
Open: reported, awaiting review.
Assigned: a supplier is now in charge of fixing it.
In progress: the supplier is working on it.
Resolved: the work is finished.
You get a notification at every status change, and you can post comments on the incident itself to add information or ask how it is going.
Editing or deleting an incident
Edit: while it is open you can correct its title, its description or add more photos. Useful if the problem gets worse or you find out something new.
Delete: only use this if you created it by mistake or duplicated it. If the problem simply sorted itself out, do not delete it: leave a comment and let the property manager close it, so the history is kept.
Tips to get it fixed sooner
One incident per problem: do not lump the lift fault together with the garage light bulb.
Search the list first: another resident may have already reported it and you may just need to comment on theirs.
If it is an emergency involving risk (a water leak, a smell of gas, someone trapped in the lift), call the property manager or the emergency services first, and create the incident afterwards.
7. Meetings and minutes
Meeting notices, agenda, voting and signing of the minutes.
7.1 Calling a meeting and sending the notice
Updated on
13/09/2026
Create the meeting with its agenda and send the notice to every owner.
The meeting notice is the document that summons owners to a meeting. The application generates it, emails it to every resident and keeps a record of the send, which is what makes the decisions taken there valid.
Meetings are called from the Calendar: ordinary, extraordinary and reminders.
Who can call a meeting
The property manager and the members of the board, usually the president.
Creating the meeting
Open the community and go to the Meetings tab.
Click New meeting.
Choose the type: ordinary (the annual one, to approve the accounts and the budget) or extraordinary (for a specific matter).
Enter the date and time of the first call and of the second one. The second is usually set half an hour later, in case there is no quorum at the first.
Write the venue.
Draft the agenda: add one item per matter to be discussed. Be specific, because no valid decision can be taken on a matter that is not on it.
Attach the necessary documentation: the budget, the annual report, quotes for building works and so on.
Save.
The meeting is created as a draft: nobody can see it yet.
Editing before you send
While it is still a draft you can edit the meeting freely: change the date, reorder the agenda items, add documents or reword anything. Review it carefully, because once the notice has gone out it should not be changed.
Sending the notice
Open the meeting and click Send notice.
Check the preview of the email residents will receive.
Confirm the send.
Every owner receives the notice by email and a notification in the application. The PDF is also published in the community for anyone who wants to download it.
If a resident says they did not receive it, use Resend notice: it goes out to them again without bothering everyone else.
Cancelling a meeting
If the meeting has to be called off, edit it and mark it as cancelled, or delete it if it was still a draft and nothing had been sent. Once the notice has gone out, it is better to cancel it than to delete it, so there is a record that it was called and then called off, and to let residents know with a message.
7.2 Producing, signing and publishing the minutes
Updated on
13/09/2026
Record the decisions taken, sign them digitally and distribute them to residents.
The minutes are the document recording what was agreed at the meeting. Without signed minutes, the decisions cannot be enforced. The application produces them from the agenda and the votes, and lets you sign them digitally.
The signed minutes are published in the «Minutes» folder, visible to residents.
Producing the minutes
Open the meeting that has already taken place, from the Meetings tab.
Click Generate minutes.
Record the attendees: tick who came and who gave their proxy to another owner. The application works out the quorum by ownership share and warns you if it is not met.
Go through the agenda items. For each one, note the discussion and the outcome of the vote: votes in favour, against and abstentions, both as a number of owners and as an ownership share.
Write up the decisions clearly: this is the part that will be acted on afterwards.
Save.
The minutes stay as a draft. You can edit them as many times as you need while they are unsigned, so take your time reviewing the wording.
Signing the minutes
Once the content is final, click Sign. They are signed by the president and the property manager or secretary:
Each signatory signs in with their own account and opens the minutes.
They click Sign and draw their signature in the box or confirm it with their digital certificate.
The minutes are sealed with the date and the identity of each signatory.
Once signed, the minutes cannot be changed. If a mistake comes to light afterwards, do not delete them: it has to be corrected by a formal amendment or raised as an item at the next meeting.
Publishing and distributing
When signed, the minutes:
Are published automatically on the community Documents tab.
Are sent by email to every owner.
Trigger a notification in the application.
Any resident can download them as a PDF whenever they like, including the minutes of meetings from previous years.
After the meeting
Decisions involving money (an approved levy, a fee increase) are not applied on their own: remember to create them on the Fees tab, referencing the minutes that back them up.
8. Communication and documents
Messages, notifications, noticeboard and the community document archive.
8.1 Community documents
Updated on
15/09/2026
Browse minutes, budgets and contracts, and upload new documentation.
The Documents tab is the community archive: minutes, bylaws, budgets, supplier contracts, insurance policies and any other paperwork that should be available to residents.
The «Residents» badge marks the folders owners can see.
Browsing and downloading
Every user in the community can see the document list and download from it. Each document shows its name, its date and who uploaded it. Use the search box to find a specific one by name.
The minutes of meetings are published here automatically as soon as they are signed, so this is where to look up the decisions taken at past meetings.
Uploading a document
Only the property manager and board members can add documents.
Open the community Documents tab.
Click Upload document.
Choose the file from your computer. PDFs, images and office documents are supported.
Give it a descriptive name: this is what residents will see and search for.
Save.
Residents receive a notification whenever a new document is published.
Deleting a document
You can delete a document from its menu. Bear in mind the action cannot be undone and the document will no longer be available to any resident, so think twice before removing a set of minutes or a contract still in force.
Recommendations
Use names that include the year: "Budget 2026" is far easier to find than "Budget".
Upload documents as PDF whenever you can: every resident will be able to open them without extra software.
Do not upload documents holding third-party personal data that should not be public within the community.
8.2 Messages and notifications
Updated on
15/09/2026
Write to your property manager or the board and keep up with your community alerts.
The application brings all communication with your community into one place, so nothing gets lost in email chains or messaging groups.
Announcements are pushed as notifications and can be marked urgent.
Messages
The community Messages tab works like an inbox of conversations. Each thread groups one topic together with its replies.
Writing a new message
Open your community and go to the Messages tab.
Click New message.
Choose the recipient: the property manager, the board or the whole community, depending on your permissions.
Write a clear subject and the body of the message.
Send it.
The recipient gets a notification and can reply in the same thread, which keeps the whole conversation tidy and easy to look up later.
Which channel to use
If it is a fault, do not send a message: create an incident instead. That way it is properly logged, a supplier can be assigned to it and you can follow its progress.
For questions about a fee, a meeting notice or a document, a message is the right channel.
Notifications
The bell icon in the top menu shows your pending alerts. You will be notified when:
A meeting notice is published or a set of minutes is signed.
New fees or an extraordinary levy are published.
The status of an incident you reported changes.
A new document is uploaded.
You receive a message.
Clicking an alert marks it as read and takes you straight to the content. Important alerts are also sent by email, so it is worth keeping your address up to date in My profile.
9. Facilities and bookings
Booking common areas, time slots, guest passes and QR access control.
9.1 Adding facilities, time slots and validating passes
Updated on
13/09/2026
Set up which areas can be booked, define their timetable and control access.
Before residents can book anything, the facilities have to be created and their time slots defined. This is done by the property manager and the board members.
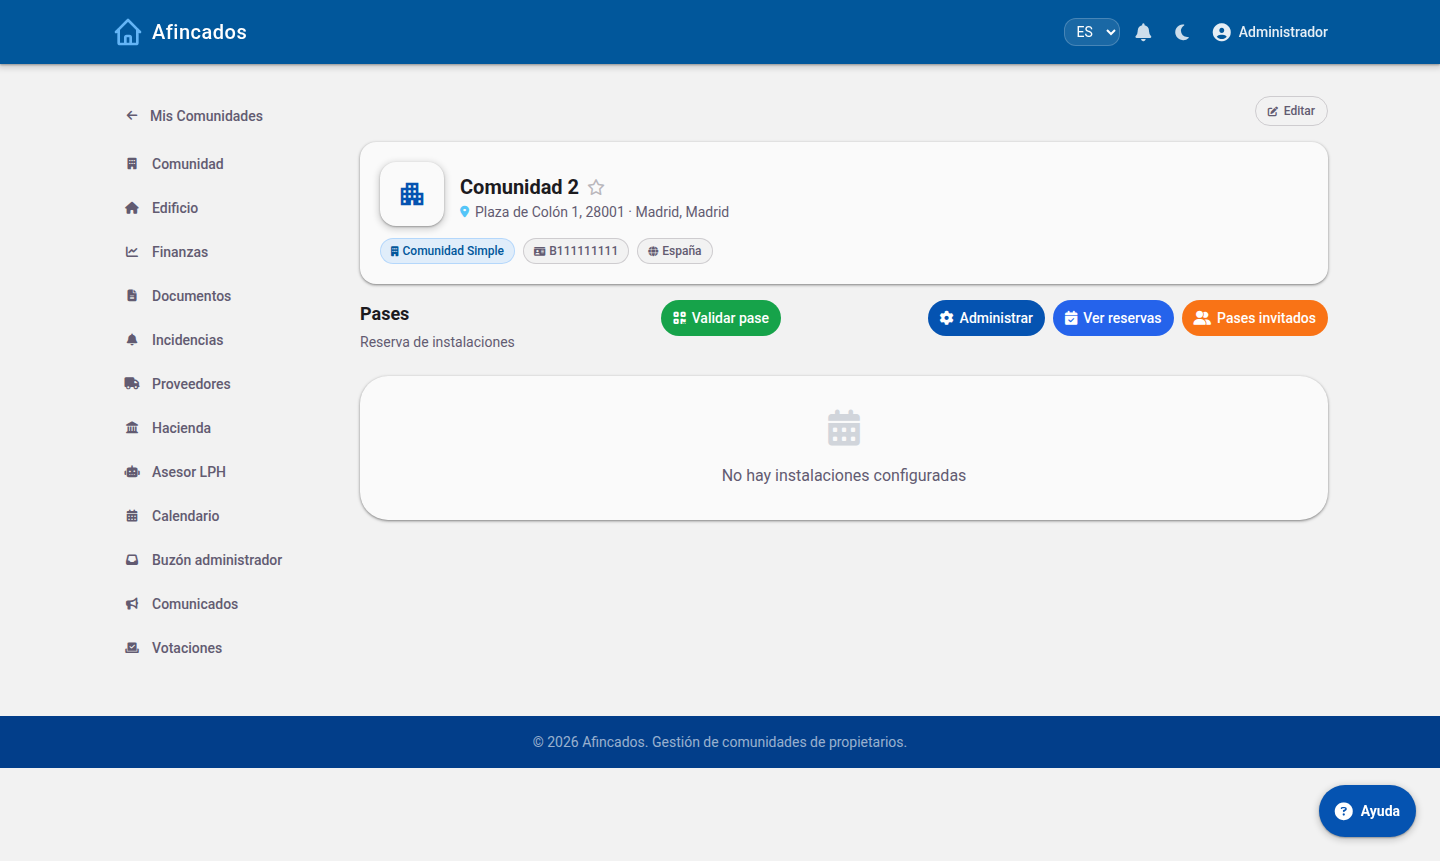
From Passes you add facilities, define time slots and validate QR passes.
Adding a facility
Open the community and go to the Passes tab.
Click Manage and then New facility.
Enter its name ("Padel court", "Function room", "Pool").
Define the usage rules: how many simultaneous bookings a resident can hold, how far in advance they can book and whether guests are allowed.
Save.
Defining the time slots
A facility with no time slots cannot be booked. Slots are the time bands the day is divided into.
Open the facility and click New slot.
Enter the start time and the end time (for example, 10:00 to 11:30).
Tick the days of the week the slot is available on.
Save and repeat for the remaining bands.
To delete a slot, click it and choose Delete. Be careful if bookings have already been made on it: let the affected residents know first.
Enabling or disabling a facility
When an area cannot be used for a while (the pool in winter, a court under repair), do not delete it: use the Enable / Disable toggle. The facility stops accepting new bookings but keeps its settings and its history, and you can switch it back on when it is available again.
Seeing and managing bookings
From Bookings you see every booking in the community, with who booked, which facility and when. You can cancel a booking if you need to, for example if the area has to close because of a fault; the resident is notified.
Validating passes
The Validate option opens the QR code reader. Use it at the entrance to check that a booking or a guest pass is valid.
Click Validate.
Scan the QR code shown by the resident or their guest.
The application confirms whether the pass is valid for that day and that facility, or whether it has expired or already been used.
This is the tool used by the caretaker or whoever handles access control.
9.2 Booking facilities and creating guest passes
Updated on
13/09/2026
Book the court or the function room, cancel if you cannot make it and invite outside guests.
If your community has bookable common areas (a padel court, the pool, the function room, the gym), you can book them from the application and bring guests in with a QR code pass.
Each facility shows capacity and time slots; click «Book» to pick a day and time.
Making a booking
Open your community and go to the Passes or Bookings tab.
Select the facility you want to use.
Pick the day on the calendar. You will see the available slots; the ones already taken appear blocked.
Click the free slot you want.
Confirm the booking.
The booking appears in your list with a QR code. Show it if the community has access control on that area.
Each community sets its own rules: how many bookings you can hold at once, how far in advance the calendar opens, or whether there is a weekly limit. If the system will not let you book, you have usually hit one of those limits.
Cancelling a booking
If you end up not using the facility, cancel as early as you can: open the booking in your list and click Cancel. The slot goes back into the pool for other residents.
Cancelling in good time matters in communities where demand is high; some penalise bookings that are neither used nor cancelled.
Creating a guest pass
To bring in someone who does not live in the community:
On the Passes tab, click New guest.
Enter the person's name and the date of their visit.
Save. A pass with a QR code is generated.
Send it to your guest however you prefer.
The guest shows the QR code at the entrance and the pass is validated. Passes have an expiry date: they only work for the day they were issued for.
Your responsibility
Guests you register are linked to your account. You are responsible for their behaviour in the common areas, so do not share passes with people who will not be coming with you.
10. Profiles and permissions
How the role system works: what each profile sees, how roles are assigned and which content is visible to whom.
10.1 Assigning and changing a user's profile
Updated on
13/09/2026
How to add a resident, appoint board officers and give a supplier's workers access to the app.
A user's profile is not picked from a standalone permission screen: it follows from what that person is in the community. A registered owner is a resident; if they also hold a board office, they get board permissions; and someone working for a supplier signs in as a worker. Each case is handled in a different place.
Who can do it
The property manager and the members of the board. Neither residents nor workers can change their own profile or anyone else's.
Adding a resident
From the Community tab, in the users block. Registering an owner or tenant and linking them to their property gives that person access with the resident profile.
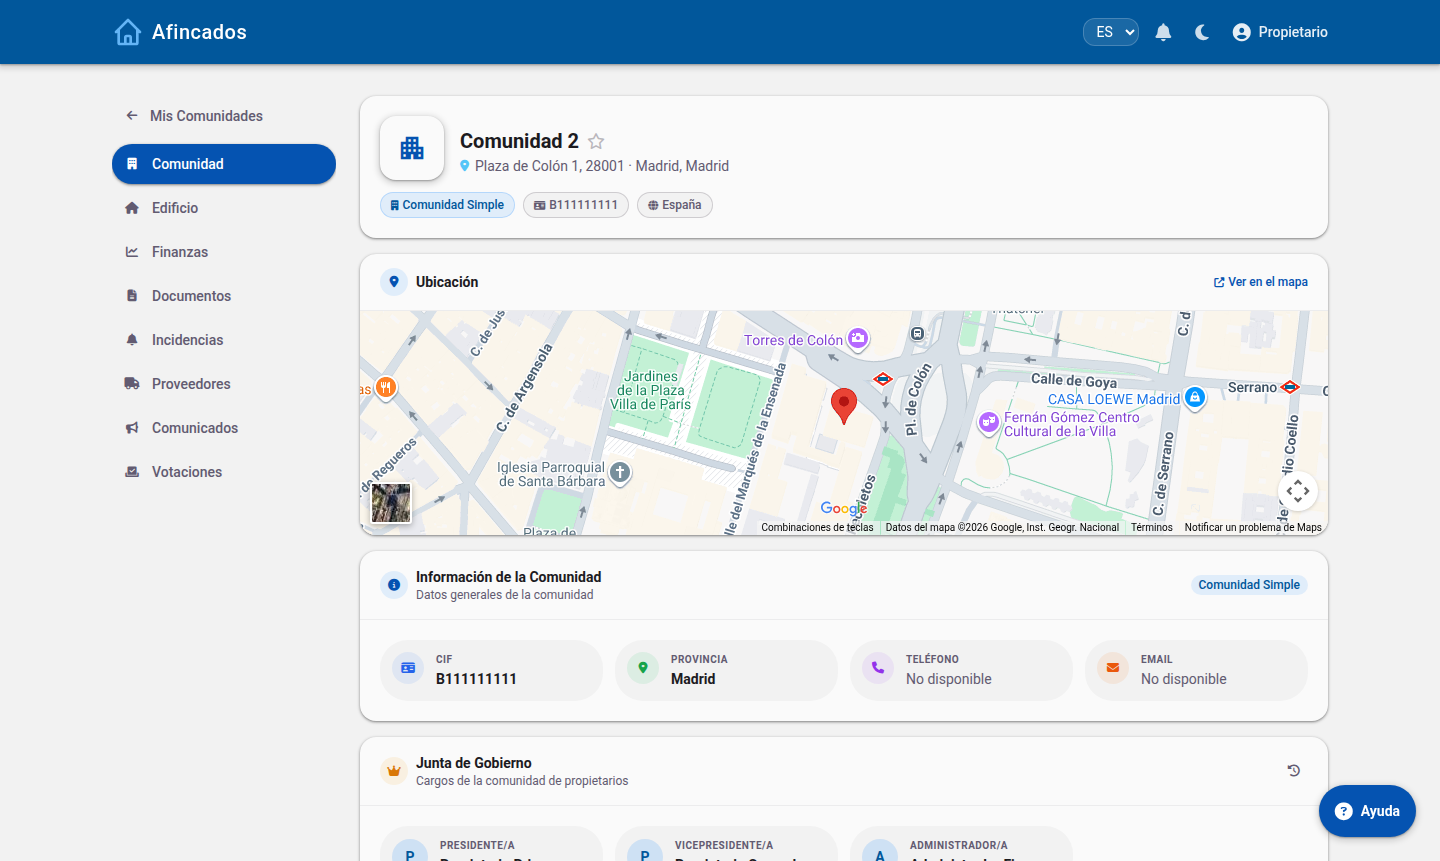
The community record holds the general data, the users and the board.
Double-check the email: access, meeting notices and urgent alerts all go there.
Appointing a president, vice-president or board member
Board permissions come with the office. In the same Community tab, the Board block lists the current officers and their history. Give a resident an office and they start managing the community with the board permissions described in the President and board guide.
It works the same way in reverse: when the term ends, the person becomes a resident again and the management actions disappear. The history keeps who held each office and when — what you need when the board is renewed after the annual meeting.
Giving a worker access
Workers are not added as residents: they hang off a supplier. In the Suppliers tab each supplier has its people, and those people sign in with the worker profile.
Each supplier lists its shifts and the people with app access.
Their access is limited to the community — or communities — the supplier serves.
Worth remembering
The profile is per community: changing it in one does not affect the others.
A profile change shows up in the user's menu: tabs appear or disappear the next time they sign in.
To cut off access for someone who is no longer an owner, remove them as a community user; removing the office is not enough.
10.2 How profiles and permissions work
Updated on
13/09/2026
The four Afincados profiles, what determines each user's view and why the menu changes from one person to another.
In Afincados, what you see depends on your profile. There is no permission screen to configure option by option: each user has a profile within a community, and that profile decides which tabs appear in the menu and which buttons you can press.
The four profiles
Property manager: the role with the most permissions. The only one that creates new communities and the only one that reaches Tax, LPH Advisor, Calendar and Manager inbox.
President and board: president, vice-president and board members. They manage almost the whole community — residents, fees, incidents, meetings, documents — but not the tax area or the manager's internal tools.
Resident: owners and tenants. They consult their community's information and take part: report incidents, vote and book facilities. They do not manage.
Worker: staff serving the community on behalf of a supplier (cleaning, maintenance, lifts…). A reduced view focused on their daily work: clocking in, their assigned incidents and their supplier's schedule.
The profile belongs to the community, not to the person
The same person can hold different profiles in different communities: you may be president where you live and a resident in your holiday flat. That is why each card in My Communities shows your role in that particular community.
Each card shows the profile you enter that community with.
When you open a community, the app loads the menu matching your profile in it. Switch to a community where you have another role and the menu changes with you.
Why a tab is missing
No Tax, LPH Advisor, Calendar or Inbox: those belong to the property manager only.
I cannot create a community: only the property manager can.
I see Finances but no buttons: residents get a read-only view.
I only see three sections: you are signing in as a supplier's worker.
The full walkthrough of every profile in the Role guides.
10.3 What each profile sees: comparison table
Updated on
13/09/2026
Side-by-side comparison of menu tabs and main actions for property manager, board, resident and worker.
Two tables summarise the whole system: which tabs each profile gets, and which actions each one can perform.
Menu tabs
Tab
Property manager
President / Board
Resident
Worker
Community
Yes
Yes
Yes
No
Building
Yes
Yes
Yes
No
Finances
Yes
Yes
Yes (read-only)
No
Documents
Yes
Yes
Yes (shared folders)
No
Incidents
Yes
Yes
Yes
Yes (only theirs)
Suppliers
Yes
Yes
Yes
Yes (own company)
Passes
Yes
Yes
Yes
No
Announcements
Yes
Yes
Yes (receives them)
No
Votes
Yes
Yes
Yes (votes)
No
My shift
No
No
No
Yes
Tax
Yes
No
No
No
LPH Advisor
Yes
No
No
No
Calendar
Yes
No
No
No
Manager inbox
Yes
No
No
No
Actions
Action
Property manager
President / Board
Resident
Worker
Create communities
Yes
No
No
No
Add users and properties
Yes
Yes
No
No
Edit ownership shares and land registry
Yes
Yes
No
No
Create fees, levies and direct debits
Yes
Yes
No
No
View accounts and transactions
Yes
Yes
Yes (read-only)
No
Report an incident
Yes
Yes
Yes
Yes
Assign and close incidents
Yes
Yes
No
No
Call meetings and publish minutes
Yes
Yes
No
No
Upload documents and set their visibility
Yes
Yes
No
No
Send announcements
Yes
Yes
No
No
Open votes
Yes
Yes
No
No
Vote
Yes
Yes
Yes
No
Staff, payslips and tax forms
Yes
No
No
No
Clock in and out
No
No
No
Yes
The key difference
Between manager and board, the line is the tax area and the internal tools: Tax, LPH Advisor, Calendar, Inbox and creating communities. Everywhere else the board manages just like the manager.
Between board and resident, the line is managing versus consulting and taking part: residents see nearly the same screens, without the management actions.
The worker sits outside that scale: not a reduced resident but a different view — shift, assigned incidents, own supplier — with no access to finances, documents or other residents' data.
10.4 Who sees each document and content
Updated on
13/09/2026
Folders shared with residents, read-only finances, assigned incidents and announcements: what each profile reaches.
Beyond the tabs each profile gets, some content is shared selectively. These are the four cases where visibility is decided content by content, not just by profile.
Documents: shared folders
The most important case, because you decide. Community folders (minutes, contracts, notices, bylaws, invoices, budgets) are either marked visible to residents or kept for management only. In the list, the Residents label marks the shared ones.
Manager view: the «Residents» label marks the shared folders.
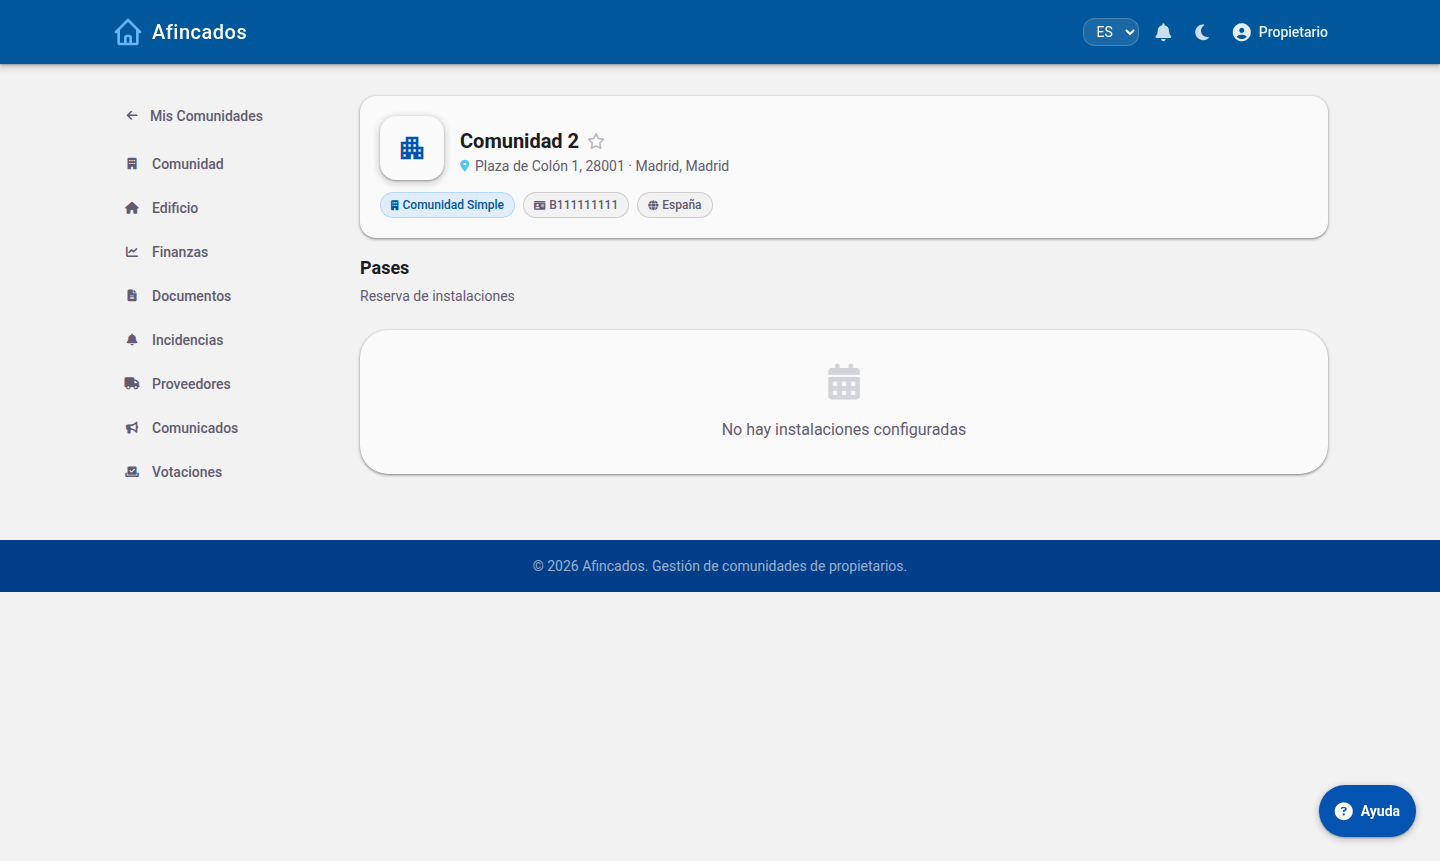
Residents only see the shared ones — the rest simply do not appear in their Documents tab.
The same community seen by a resident: shared folders only.
This is the natural way to separate what the community should know (minutes, budgets, notices) from internal management work. Check the label before uploading a sensitive document.
Finances: visible, but read-only
Accounts, balance and transactions are not hidden from residents: financial transparency is part of how a community runs. What changes is that residents have no management actions — creating fees, direct debits or transactions — only the view.
Residents see balances and transactions; the management buttons are absent.
The exception is the worker, who has no access to Finances at all.
Incidents: each role sees its own scope
Manager and board: every incident in the community, filtered by status and assignee.
Resident: can report incidents and follow their status.
Worker:only the ones assigned to them. They do not see the community's other incidents.
Announcements and votes: they reach every resident
Announcements are sent by the manager and the board and reach all residents, highlighted when urgent. Votes work the same way: management opens them and owners take part. There is no selective sending to a subset of residents.
Announcement history in the resident's view.
And personal data
The worker has no access to other residents' data: their view is limited to their shift, their incidents and their supplier. Every user manages their own data — phone, email, avatar and password — from My profile.

 Community list. The badge shows your role in each one.
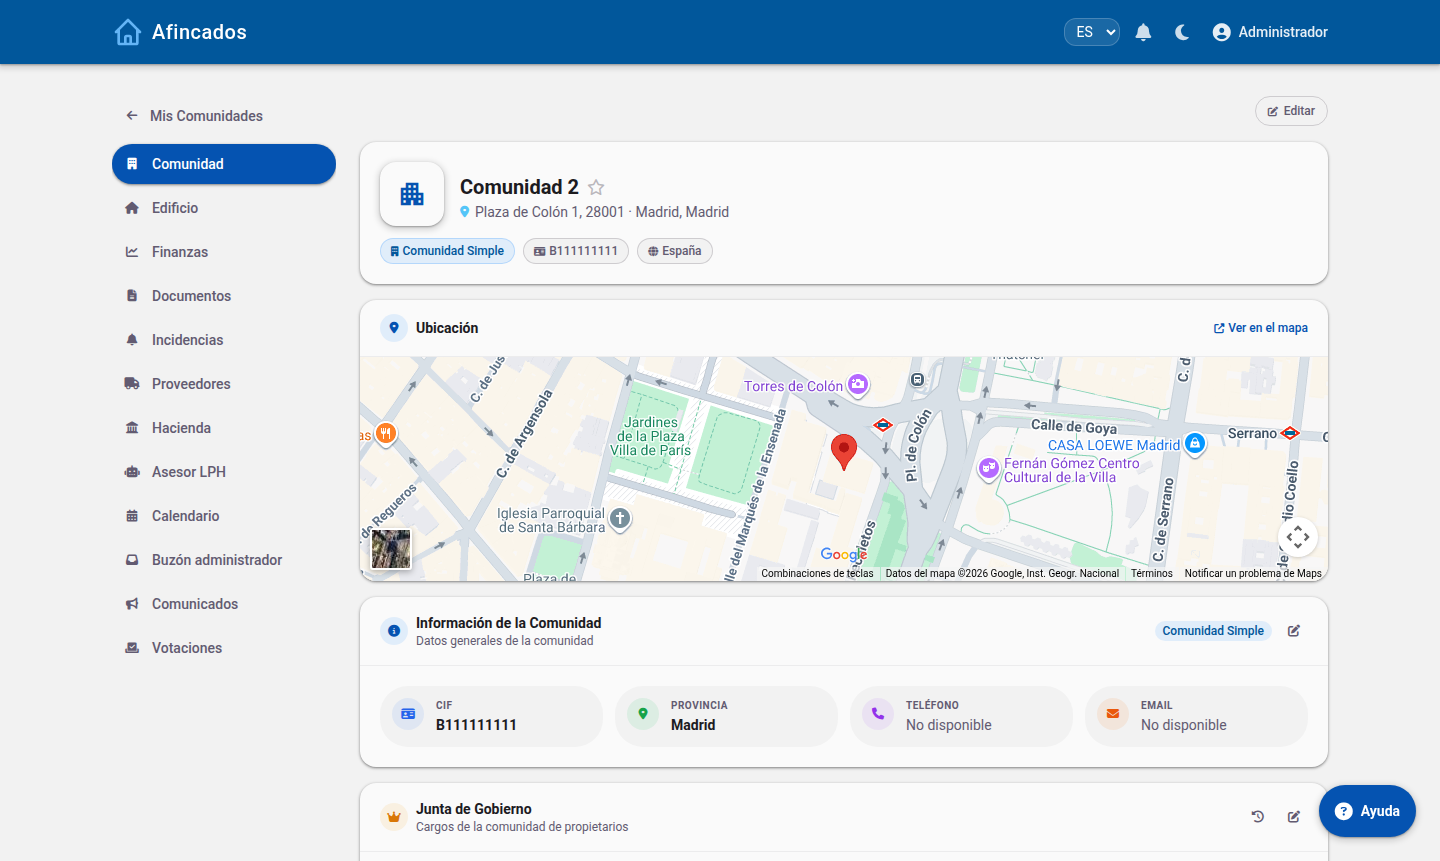 Manager view: the sidebar includes Tax, LPH Advisor, Calendar and Manager inbox.
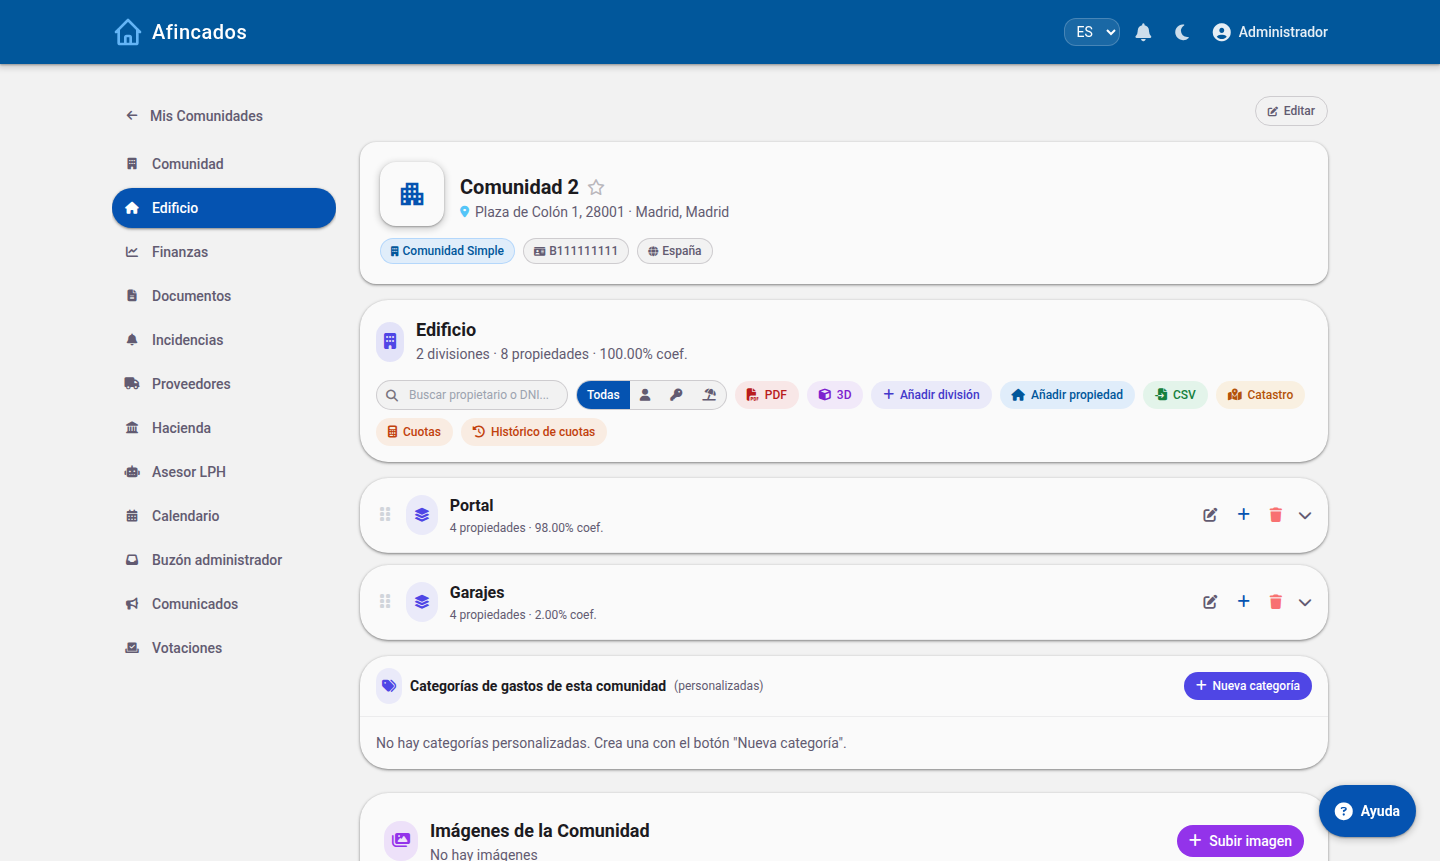 Divisions and ownership shares. Make sure the total adds up to 100%.
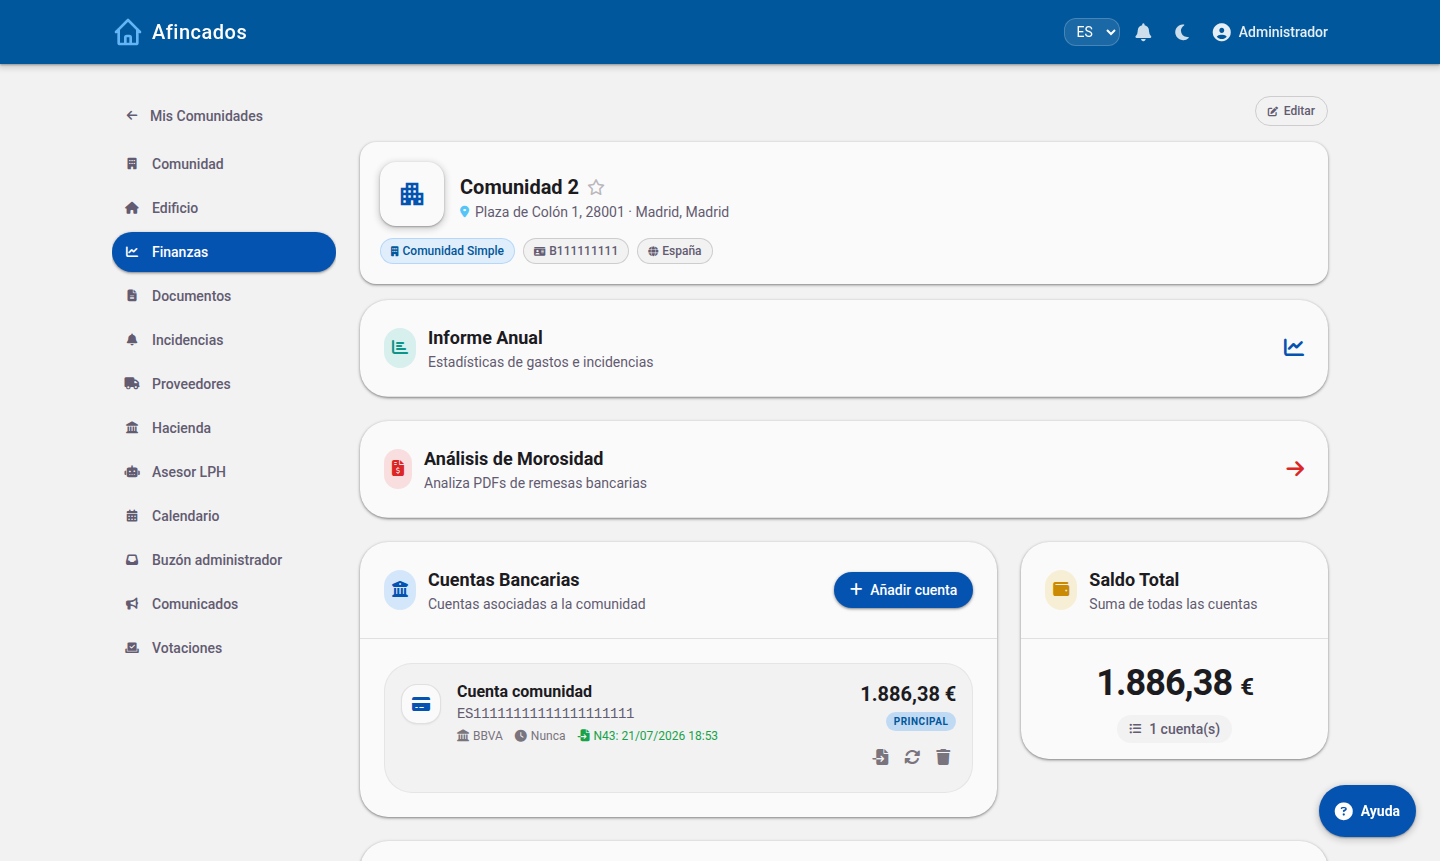 Accounts, total balance and shortcuts to the annual report and arrears analysis.
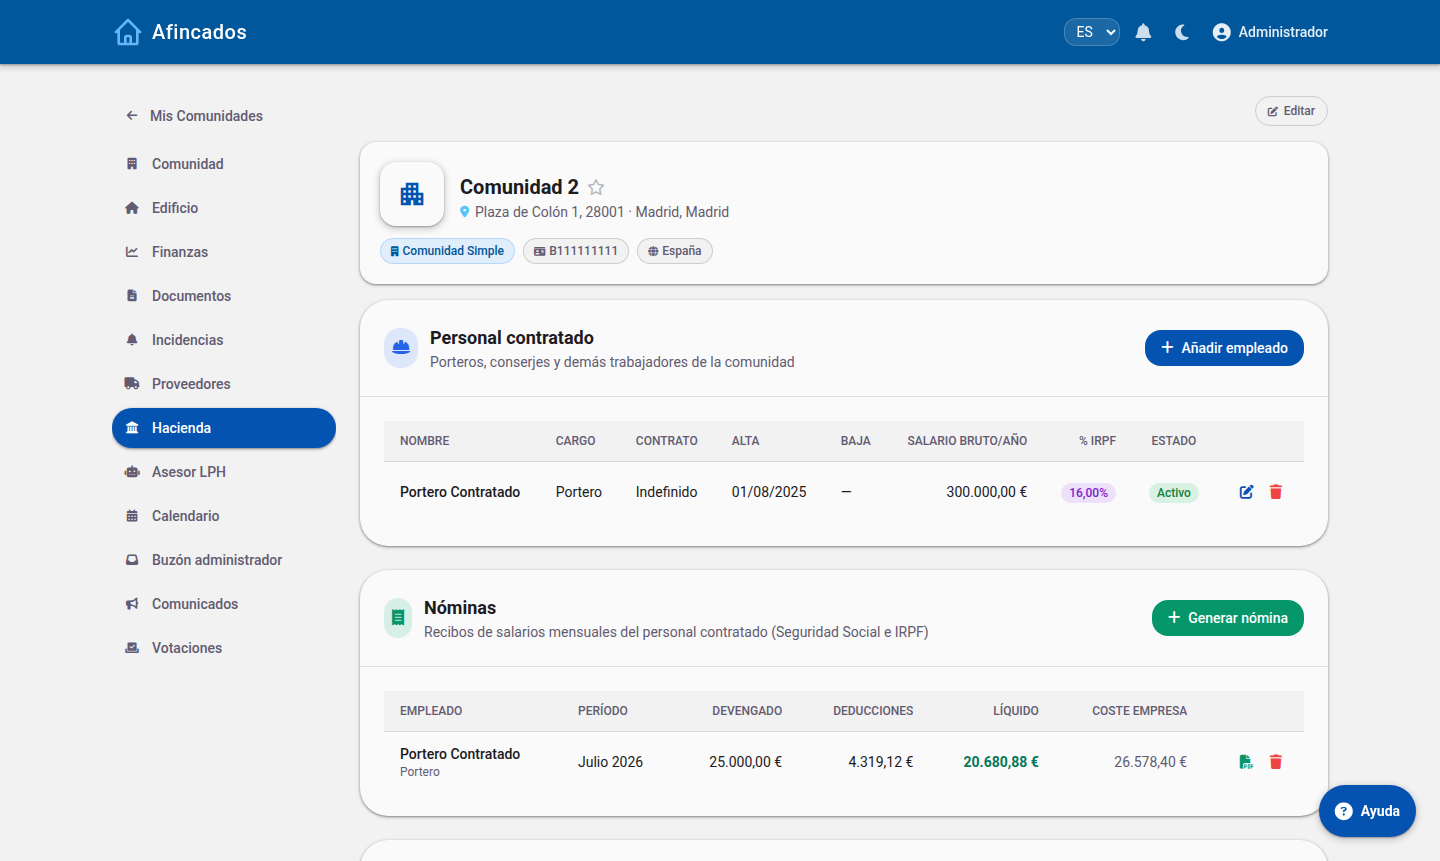 Adding employees and generating payslips.
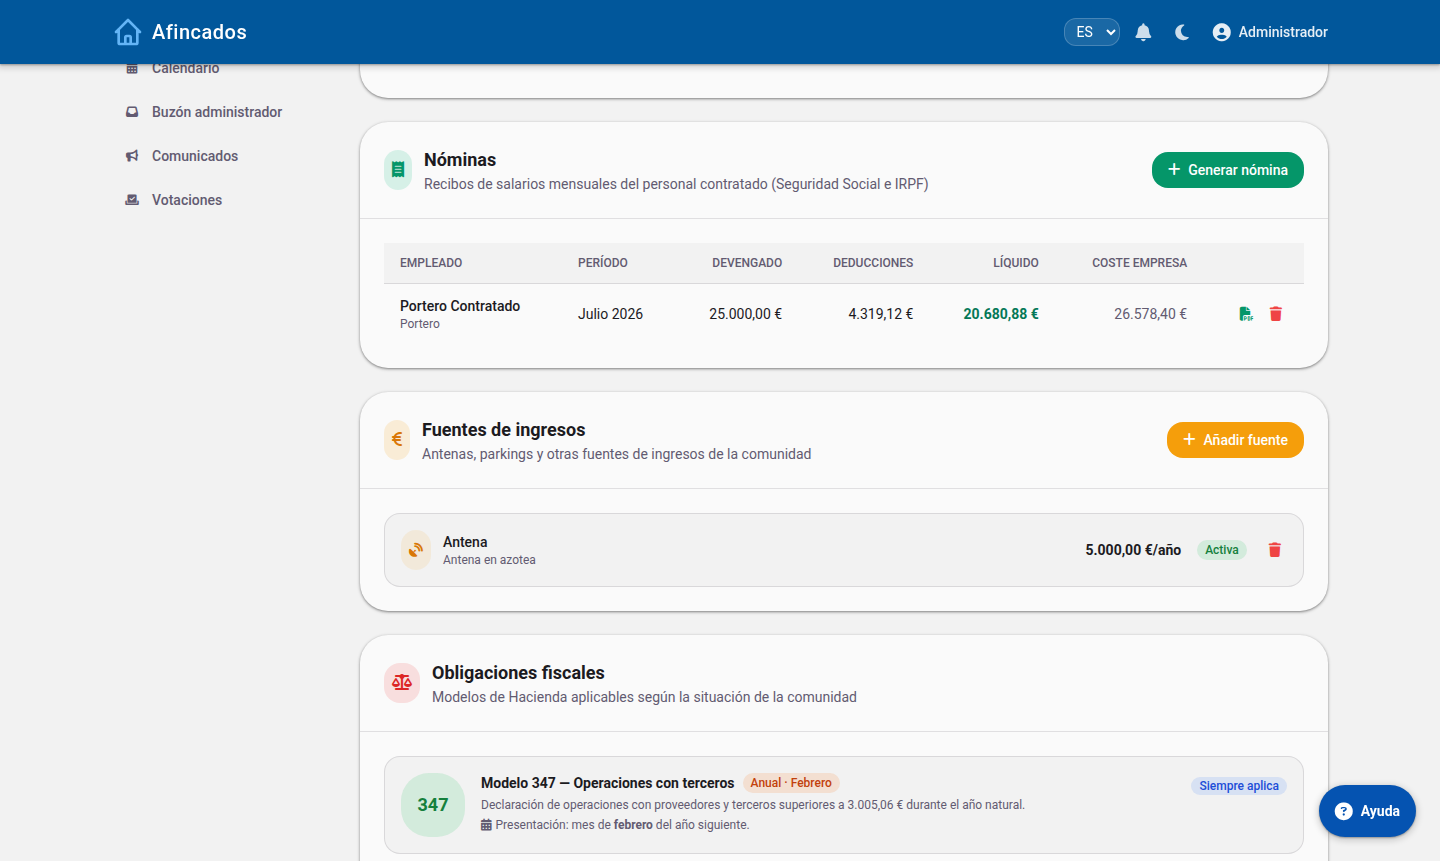 Generated payslips and the tax forms that apply to the community.
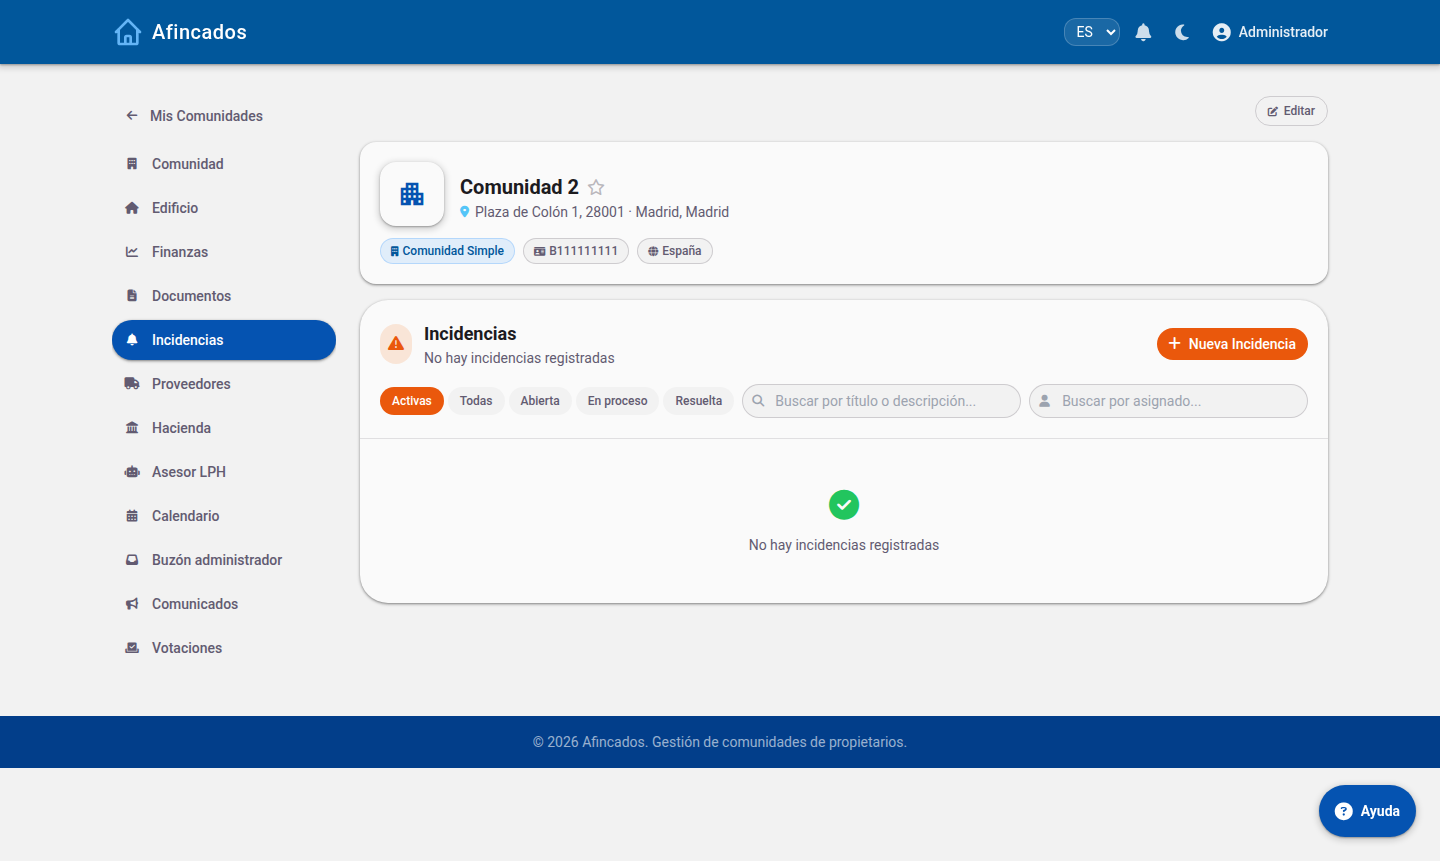 Only active incidents are shown by default: click «All» to see resolved ones too.
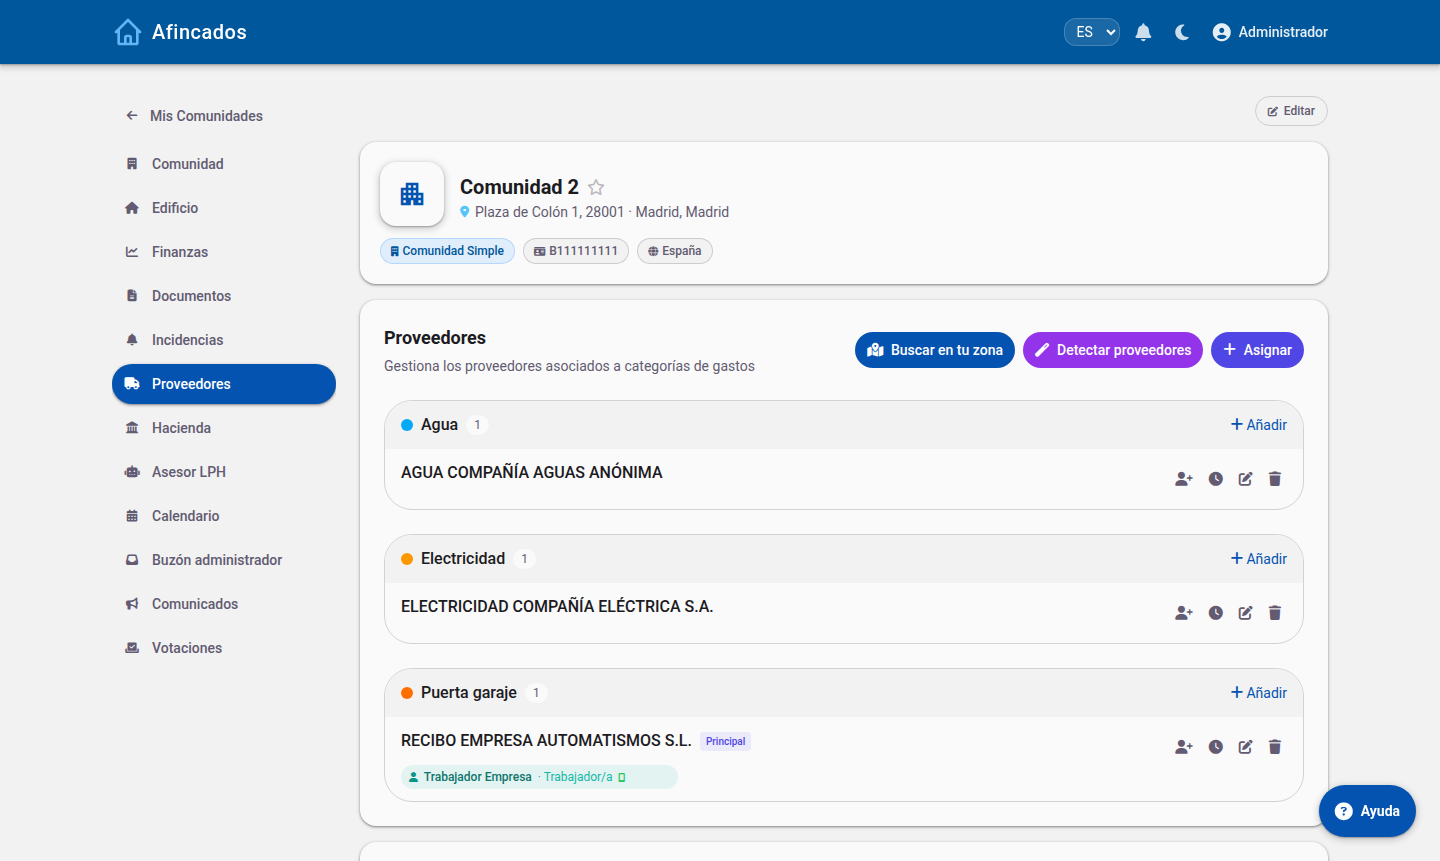 Each supplier shows its shifts and the workers with access to the app.
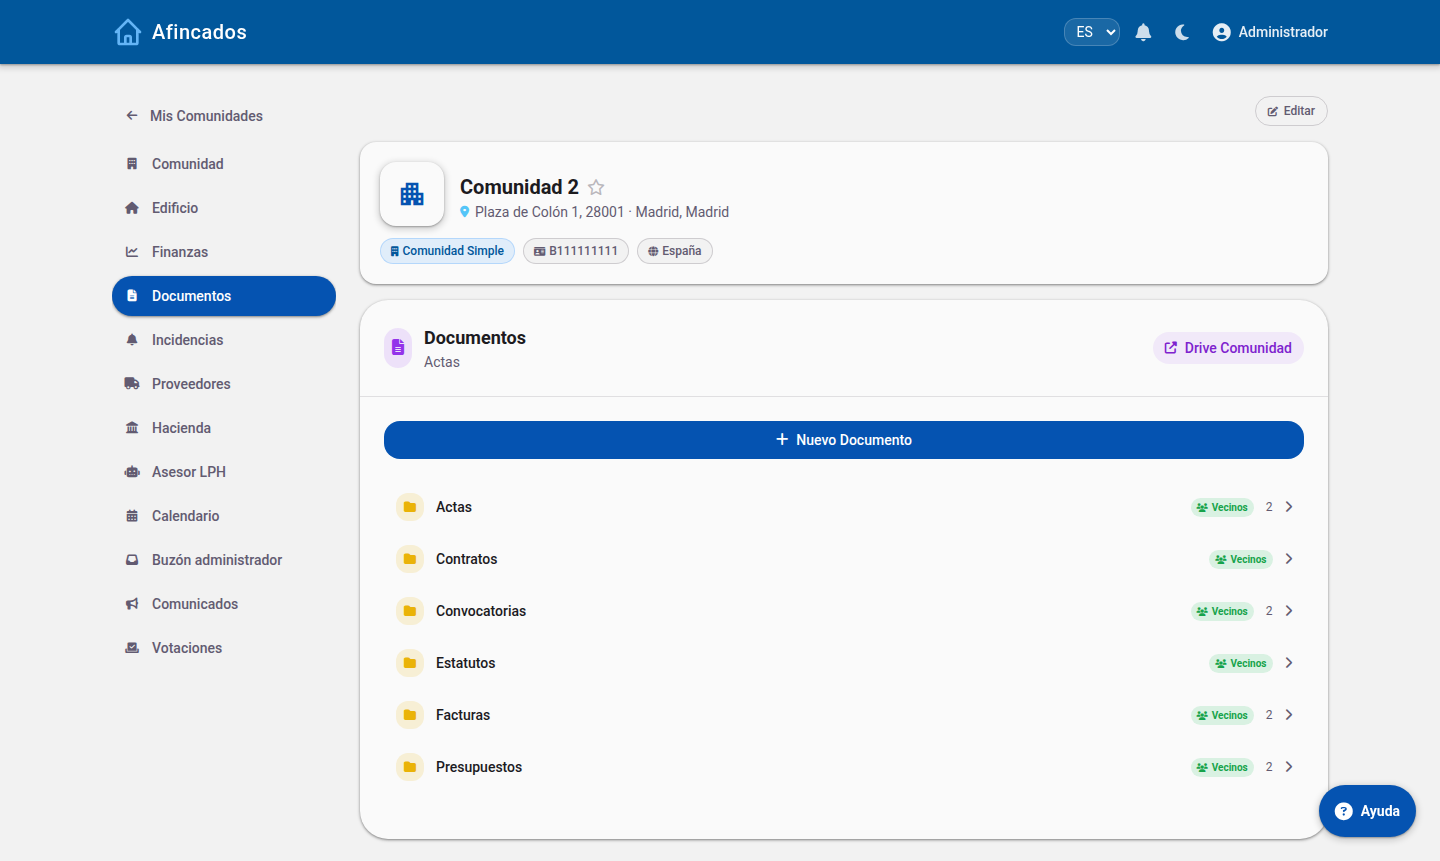 The «Residents» badge marks the folders owners can see.
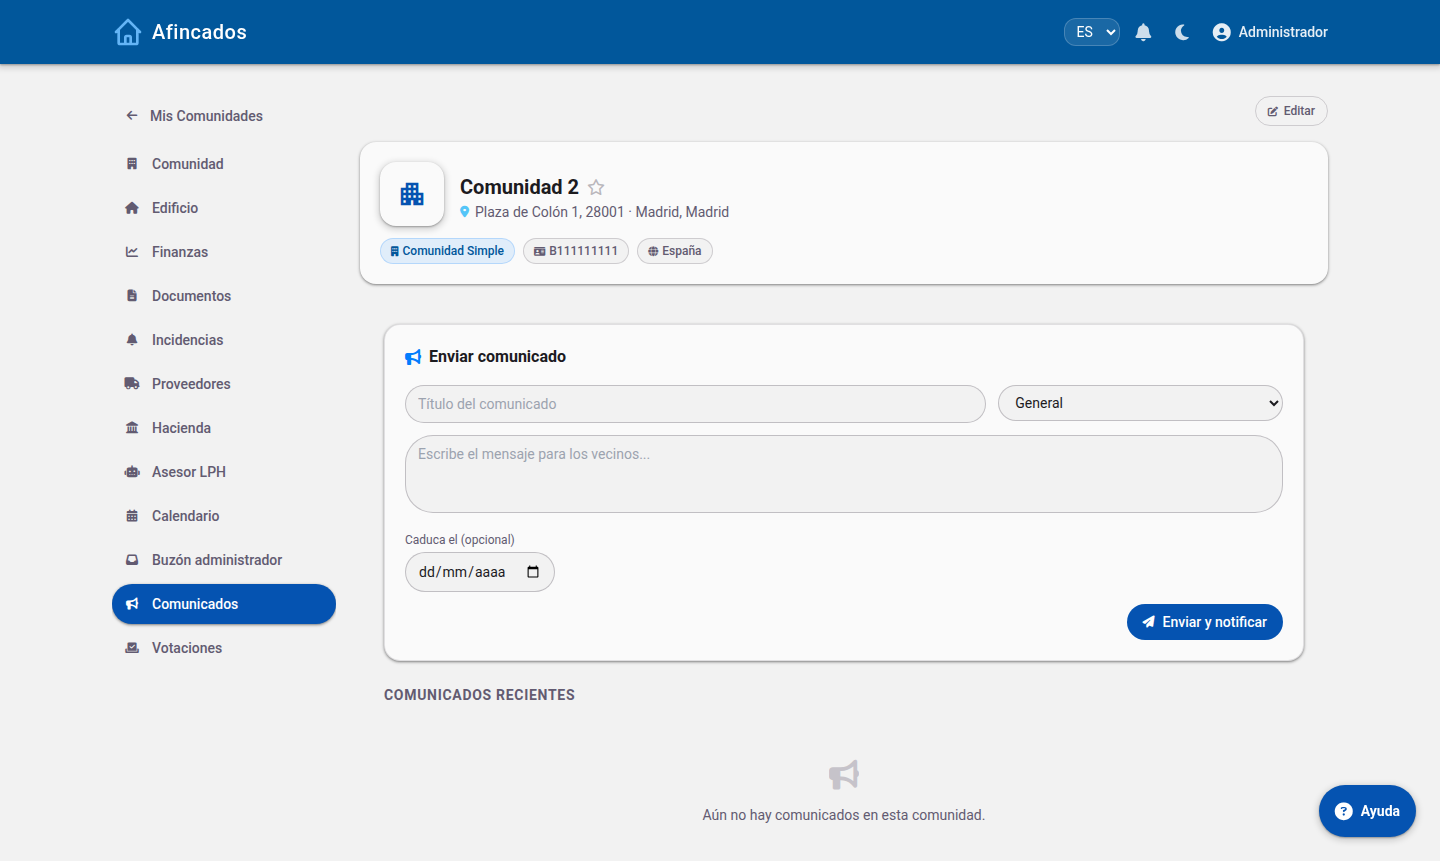 Urgent announcements are highlighted in the residents' app.
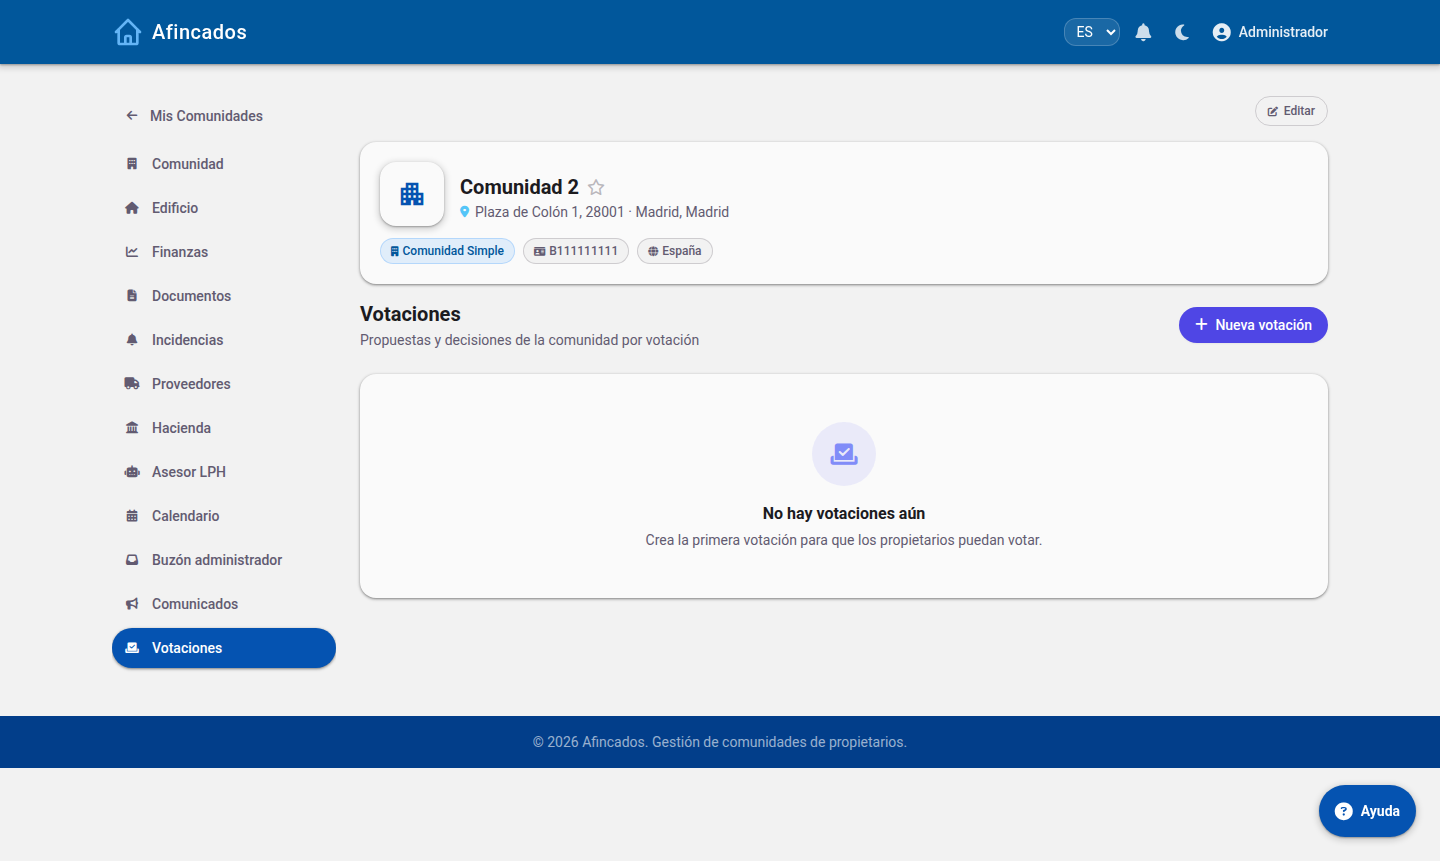 Live results and turnout by property.
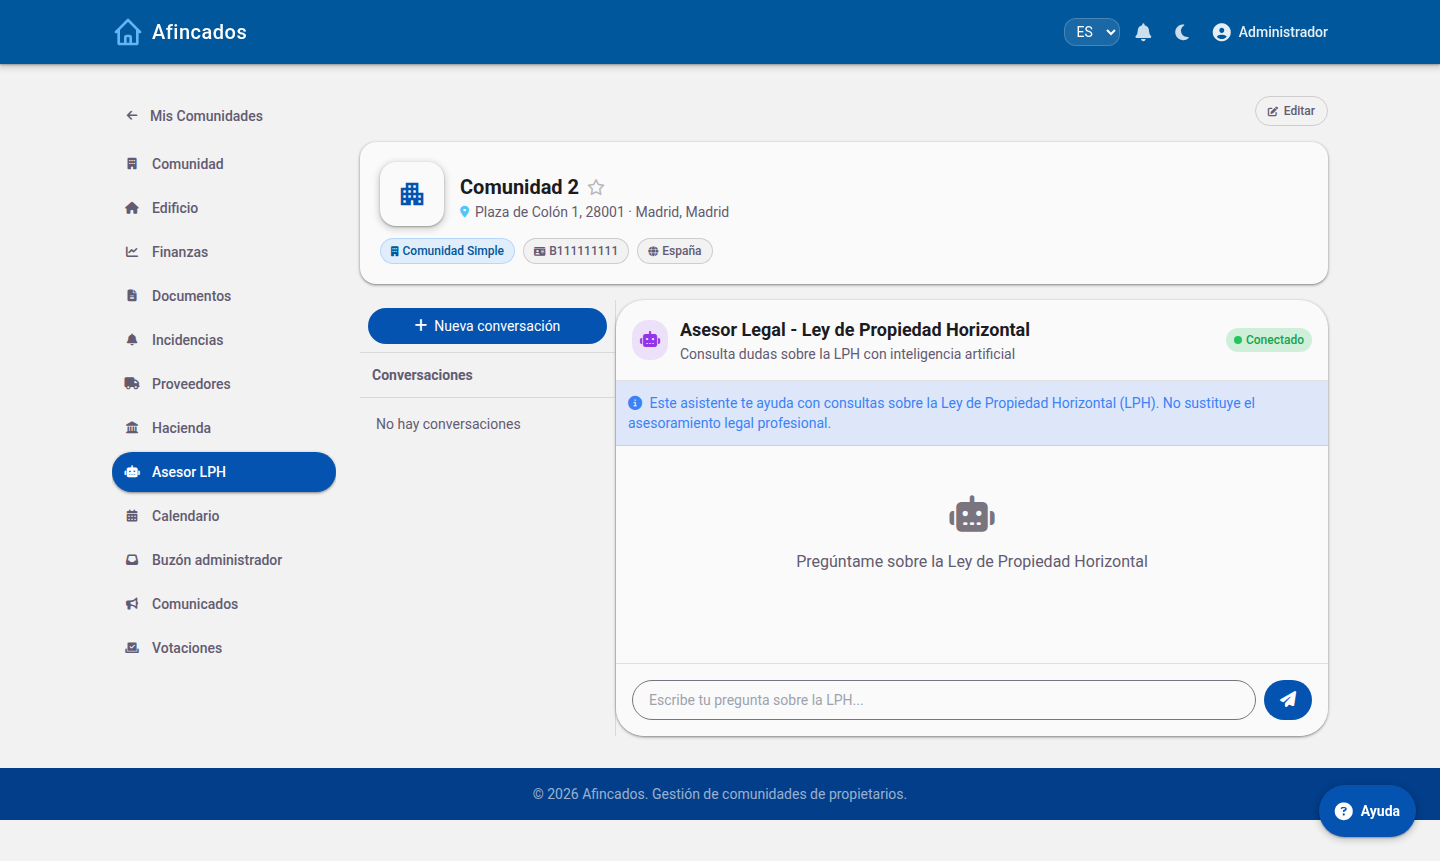 Ask about the LPH; conversations are kept in the sidebar.